It’s easy to register users with an invitation code when you have an amazing user registration and invitation codes plugin for WordPress like User Registration.
Since WordPress doesn’t allow the creation of invitation codes by default, you’re going to have to manually add the function to your site. The easiest way to enable user registration with an invitation code is simply by using a plugin. And the best tool for this job is the User Registration plugin.
It’s a WordPress user registration plugin that allows you to create custom registration pages in no time. And using its Invite Codes add-on, you’ll be able to register users with an invitation code easily.
We’ve put together this guide to help you do exactly that. Before jumping into the steps, let’s look at why you should use invitation codes in WordPress registration.
Why Use Invitation Codes in WordPress Registration?
Invitation codes are extremely useful if you’re looking for a way to provide exclusive access to certain visitors to your website. When you use the invitation code system in your WordPress registration forms, only users with the invite code can register.
This means only the select number of people you’ve given the code to can become members of your website. This is especially useful if you want to limit who registers on your site.
For instance, if you’re hosting a workshop with limited seats, you might want to control the number of participants who register. Invitation codes come in very handy in such cases.
You can also conveniently assign different user roles for users depending on the invitation code they have. Along with this, you can use it to create and set up temporary codes that’ll allow users access to certain pages.
You can even charge your users to get access to codes or provide it for free.
Now that you know why you should use invitation codes in WordPress Registration, it’s time we learn how to do so!
How to Register Users with Invitation Code in WordPress?
Since WordPress doesn’t have the invitation code feature by default, you’ll need a user registration and invitation codes plugin to add it to your registration forms.
In the steps below, we’ll be using User Registration, an incredible plugin that enables building custom registration forms with invite codes without any hassle.
So, let’s get started.
1. Install the User Registration Pro Plugin
Before we start, we should point out that you can only register users with an invitation code with the premium version of User Registration. The invitation code feature is not available in the free version.
You’ll need to go to buy a premium plan to access the Invite Codes add-on to create and add invitation codes to your registration forms.
So, your first step is to install the User Registration Pro Plugin which is actually quite easy. Go to User Registration’s official pricing page and buy a Plus plan or above. You must choose the Plus plan or Professional Plan since the Invite Codes add-on is only available in these plans.
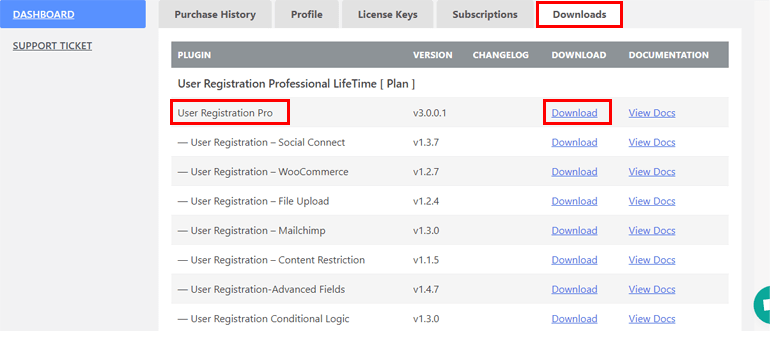
Once you’ve bought a plan, you can log into your User Registration account.
Here, find the User Registration Pro file and download it. It’ll be saved as a ZIP file on your device.
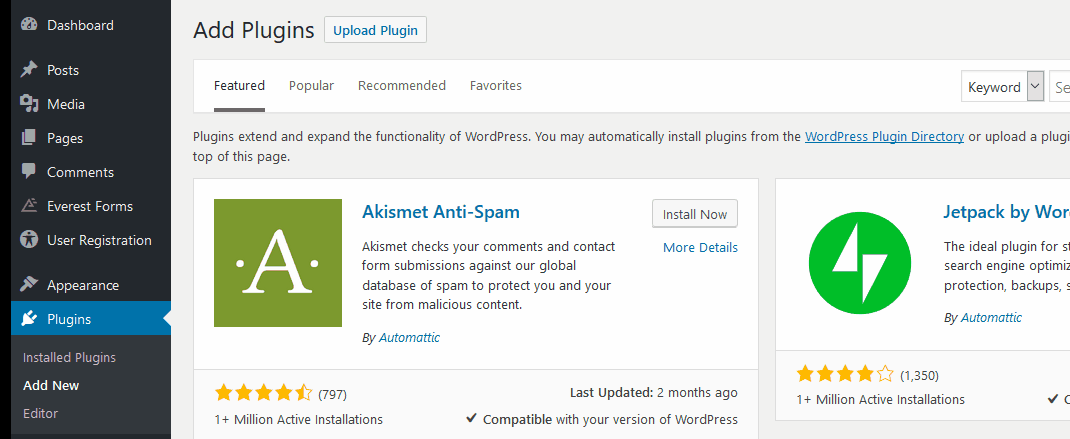
Then, log into your WordPress dashboard and navigate to Plugins >> Add New. Click on the Upload Plugin button and upload the file you just downloaded.

After that, hit the Install Now button and then Activate the Pro plugin.
Don’t forget to allow frontend registration for your WordPress site. You can simply do that by going to the Settings page through your admin sidebar.
In the General Settings, look for the Membership option and make sure to check the box beside Anyone can register.
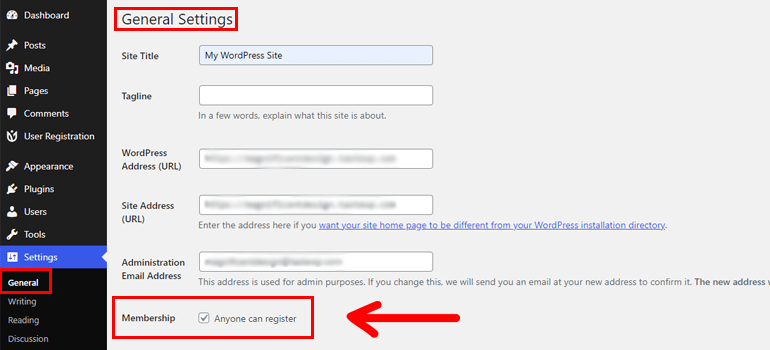
This option is turned off by default so as not to allow any user to find your site’s registration page and register themselves. When you turn this feature on, your users will be able to register with an invitation code from the frontend.
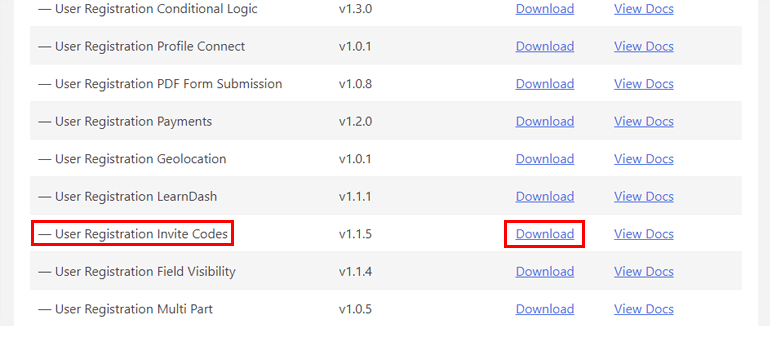
2. Install and Activate the Invite Codes Extension
After you’ve installed User Registration Pro, go back to the Downloads tab and search for Invite Codes add-on from the list of available add-ons.
After you download the ZIP file, open your dashboard and click on Plugins >> Add New.
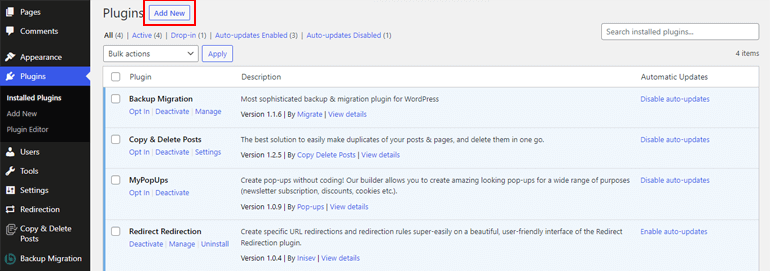
Click on the Upload Plugin button to upload the file that you’ve downloaded.
Next, click on Install Now and then Activate Plugin to complete installing the Invite Codes extension.
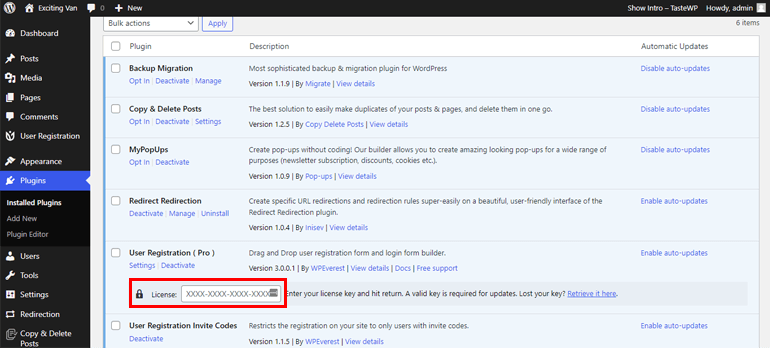
Also, you’ll see a notice telling you to enter the License Key. You’ll find it at the WPEverest account under the License Keys tab.

Now copy and paste it in the field under User Registration (Pro). You should do this step to enable quick updates right from the Plugins page.
Now, you’re all set to use the add-on!
3. Add Invitation Code Field to the User Registration Form
In order to do add an invitation code field, you need to first create a registration form by going to User Registration >> Add New.
The User Registration plugin allows you to intuitively create forms from this page using its drag-and-drop interface.
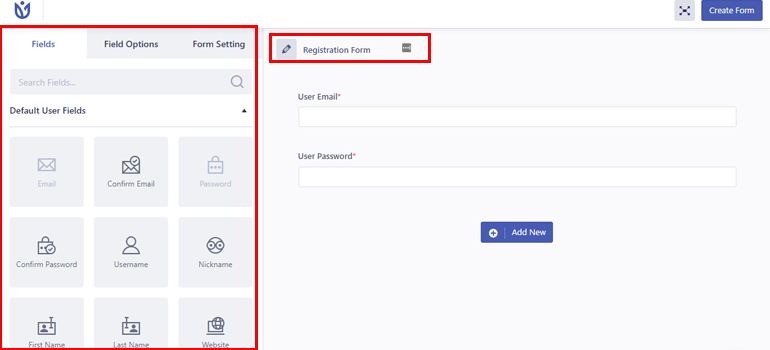
Start by creating a form and name your form. Then, simply drag and drop the fields you can see at the left and add it to your form.
In order to add a field for invite codes, you’ll need to scroll down and find the Invitation Code field in the Extra Fields subsection.
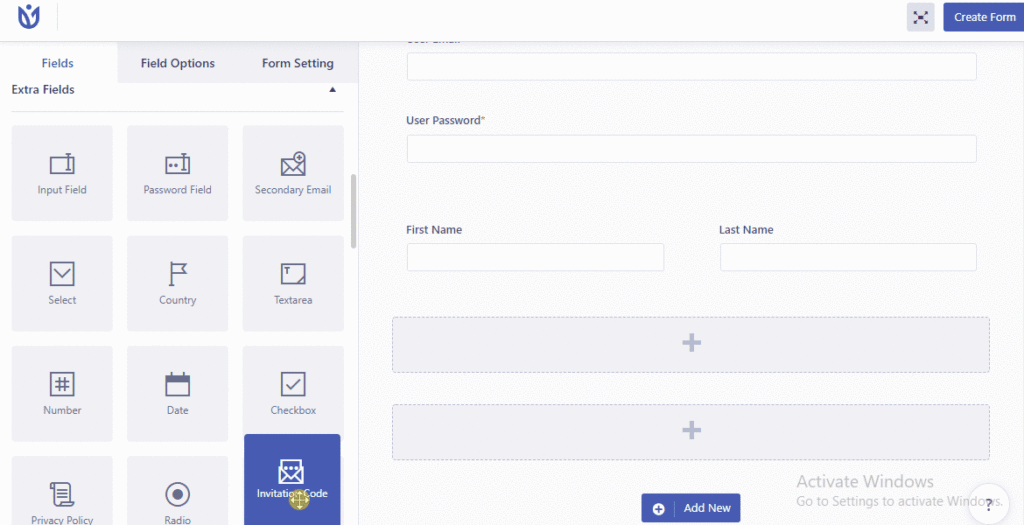
Simply click on it and drag it to the desired form row. This field will now make user registration with an invitation code possible for your users.
Once the invitation code field is created, you can click on it to bring up the Field Options for the field.
By editing the label, you can change what it says in place of ‘Invitation Code’.
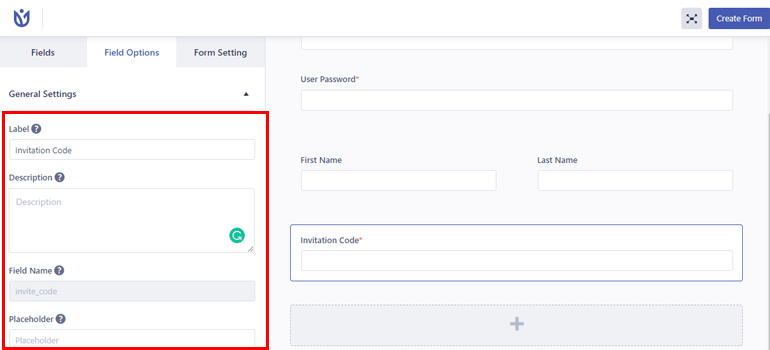
From here, you can also add a Description for the field and change the Placeholder text.
Below that, you’ll find another option to make the Invitation Code a Required field. Moreover, you can Hide the label entirely if you want.
Once you’re done, click on the Create Form button on the top-right.
4. Create the Invitation Codes
Just adding an invitation code field is not enough. Your next step should be creating the invite codes. Otherwise, your users won’t have any code to register with.
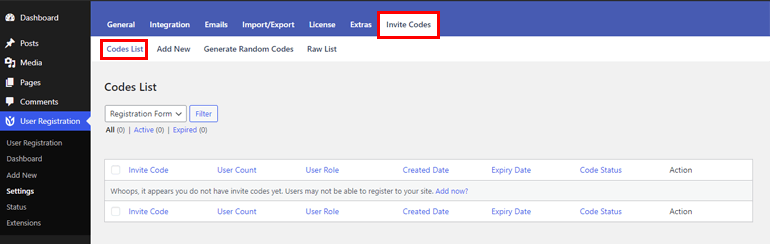
To do that, go to User Registration >> Settings through your sidebar and click on the Invite Codes tab.
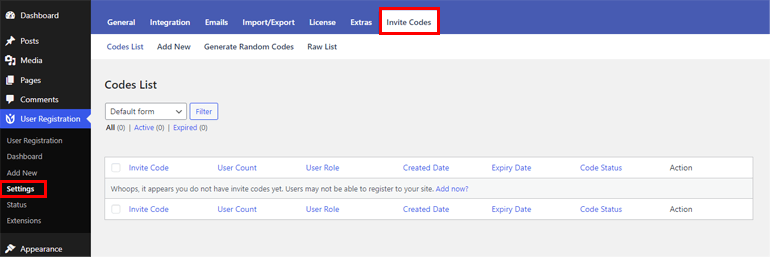
This lands you on the Codes List page, where you’ll be able to view, edit and manage your invitation codes.
However, to manually create new user registration invitation codes, click on the Add New page. You’ll see a bunch of options that enable you to create a new invitation code.
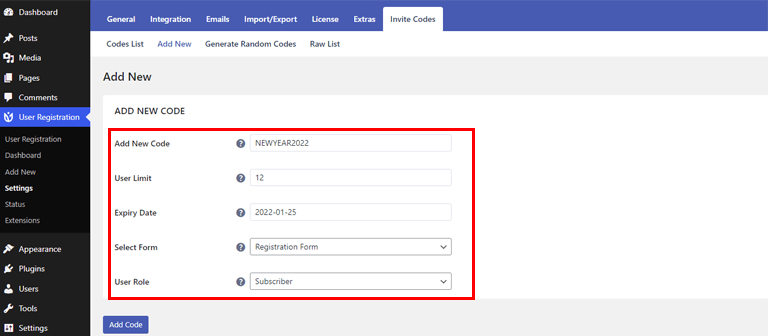
To help you understand how it works, we’ve created a new code in the image above. The code we’ve added is NEWYEAR2022. It has a user limit of 12 unique users and expires on January 25, 2022.
With the User Limit field, you can change the number of users that can use the same code. For example, we’ve set it up at 12. If you leave it empty, the code can be used an infinite amount of times.
Similarly, you can set the Expiry Date for the code. Leaving it empty means that the invitation code will never expire.
Below that, you can use the Select Form field in order to set the form for which the code will be valid. Use the drop-down list and select the user registration form you want.
Finally, use the User Role field to select the WordPress user role to be assigned to the visitors who use the invitation code.
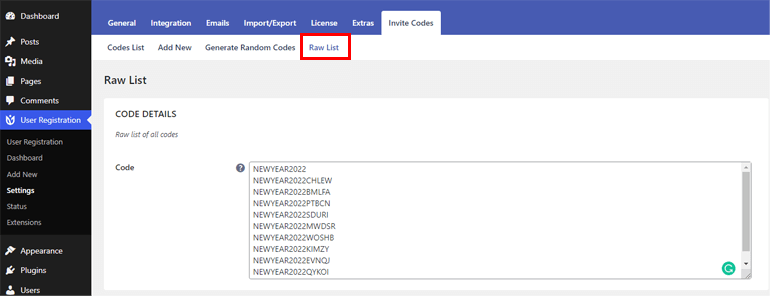
You can also generate a bunch of codes at the same time instead of individually adding new invitation codes. To do that, click on the Generate Random Codes tab under Invite Codes.

Using the Code Numbers field, you can set the number of codes to be created. Similarly, the Code Prefix field allows you to add a prefix to all the generated codes in order to make them more distinct.
Like the manually generated codes, you can also set the user limits, expiry date, and permission provided by the code. And same as before, you’ll need to select the form for these codes as well.
Besides that, you’ll see a Raw List tab beside Generate Random Codes where you get to see the Code Details.
And with that, you’ve successfully created a valid invitation code for your registration form with the invitation code field.
5. Configure the Settings for Your Registration Form with Invitation Code
While you’re done with the creation part, you need to click on the Form Settings tab to configure the registration form settings.
Under the General tab, you can configure the User login option, set Default User Role, Enable Strong Password, edit the Form Submit Button Label, and much more.
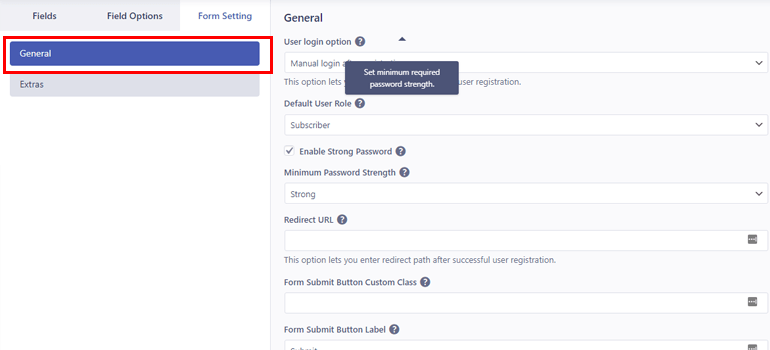
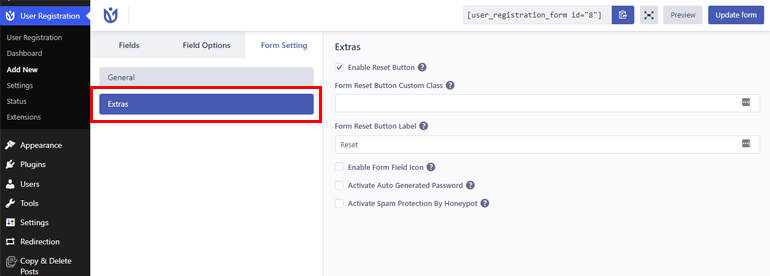
Similarly, right below the General tab, you can see the Extras tab. Here, you get to Enable Reset Button, Enable Form Field Icon, Activate Auto Generated Password, and so much more.
You can configure these settings and move on to your next step!
6. Insert the Form into Your Site
Once you’ve created a form with an invitation code field as well as some actual invitation codes, you’ll now need to add the form to your site.
You can easily do it in two ways; create a new post or page in WordPress, or either update the form on an existing page or post.
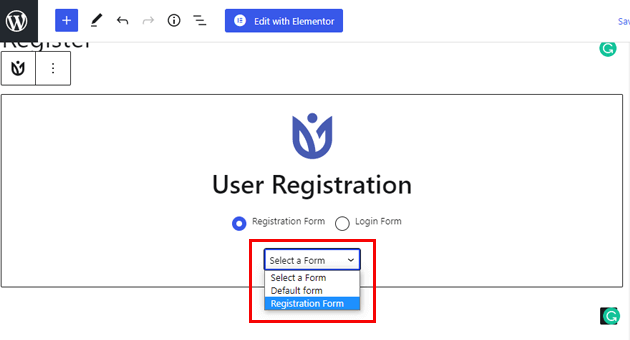
Open the page or post of your choice, and click on the ‘+’ icon. Then, choose the User Registration block.
After that, select the form you’ve just created from the drop-down to add them to your page.
An alternative way to insert the registration form in your site is to copy the form shortcode and paste it on your page or post.
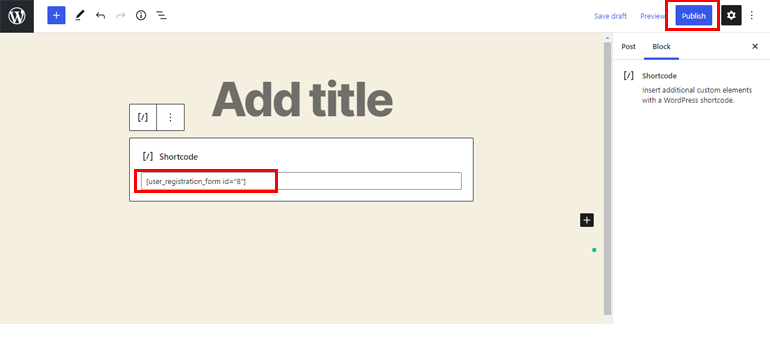
All you need to do now is to type in your page name and click on Publish.
Once you’ve done this, you can register users with invitation codes on your WordPress site.
7. Manage Your Invitation Codes
There’s one more thing left for you to do and that is to manage your invitation codes.
Hence, go to User Registration >> Settings >> Invite Codes. You’ll be seeing a Codes List page, where every code you’ve created will be listed.
From here, you can check their creation and expiry date, whether they’re active or not, their user role, as well as the user count for each of the codes.
You can even edit or delete the existing invite codes from here.
Additionally, go to Users >> All Users to see the current list of users, their roles, alongside the invite code they used.
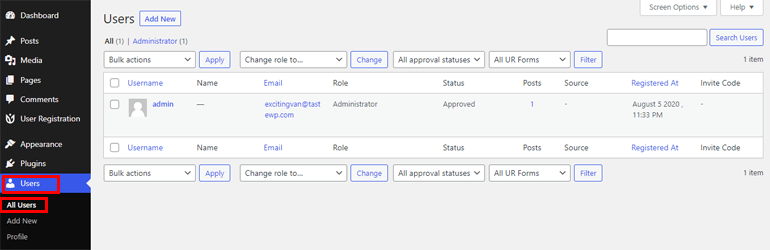
From there, you get to keep track of what invite codes were used by which user easily.
Conclusion
So, this ends our easy guide on how to register users with invitation codes in WordPress. It’s a good idea to register users with invitation codes if you want to provide exclusive access to certain visitors to your website.
A great plugin like User Registration is one of the best tools to help you do so. With User Registration, you can register users easily and build any sort of form you wish. The plugin offers a great set of features to help you make custom registration forms.
For instance, if you own an online store, User Registration lets you add extra fields to your WooCommerce user registration forms. You can even enable admin approval for them.
We have more articles like this on our blog, detailing all of the ways you can use User Registration for your site. So, make sure you check it out. Also, follow us on Facebook and Twitter to stay updated!


![Zakra 3.0 | Zakra Pro 2.0 Release [Major Updates!]](https://i.ytimg.com/vi/g3rifl7kWvg/maxresdefault.jpg)