
Wondering how to create a user registration form in WordPress? If your answer is yes then, your search ends right here. By the end of this article, you’ll learn how to easily add custom WordPress user registration forms to your website.
We’ll discuss all the default user registration features in WordPress and how you can create registration forms with the help of plugins.
But before that, let’s look at why user registration forms are so crucial to WordPress websites.
Why Do You Need User Registration Forms in WordPress?
Before we delve into anything else, let’s talk about why you need user registration forms in WordPress. We’ve listed a few reasons for you to use registration forms in WordPress below:
- Collect User Information: Placing the appropriate form fields in a registration form provides valuable data on your users. Analyzing and understanding your users will help you decide which direction your website should go next.
- Email Marketing: Registration forms help you amplify your marketing efforts. You can create email lists of registered users and send them offers, research papers, invitation codes, and more in bulk.
- Manage WordPress User Roles: With front-end registration forms, you’ll be able to automatically assign user roles and permissions to every user on your site. This cuts down a lot of unnecessary work from your side as the users register themselves.
With that said, let’s discuss what methods you can use to build registration forms in WordPress.
Methods to Build WordPress Registration Forms
There are two ways to create a user registration form in WordPress: with or without a plugin. Here’s a brief look at both of the methods:
1. The Default User Registration Feature in WordPress
Lucky for you, WordPress already comes with a default user registration feature. You can find a widget called Meta in the Appearance section of your WordPress dashboard.
All you have to do is create a meta widget. It’ll automatically generate a module with links to the registration and login page. Following these links, your users can register themselves easily.
The meta widget can be placed in the footer or header depending on the layout of the WordPress theme you’re using.
Pros:
- You don’t have to create a registration or login form yourself.
- No need for third-party plugins or services to build a registration form.
Cons:
- There’s no easy way to customize the login and registration form.
- You cannot add more form fields other than the default WordPress user fields.
For more details, please check our full guide on building registration forms without a plugin.
2. Using a WordPress User Registration Plugin
The next method is to create a custom WordPress user registration form with the help of a plugin. Luckily, there are plenty of registration plugins in WordPress.
A WordPress registration plugin helps you build registration forms and add them to your website. This way, users can fill in their details and submit the form to complete the registration.
That’s not all. You can also assign user roles directly from the registration form settings.
This evidently makes your job much easier as the site owner. Moreover, a lot of these registration plugins allow you to manage your user entries too. You can also integrate features like anti-spam protection to prevent spam bots and malicious registrations on your site.
What’s the Best WordPress User Registration Plugin?
There’s no reason why one should not use a WordPress user registration plugin with all these benefits. And the best option you can find is User Registration.
It’s a WordPress user registration form plugin that allows you to create custom registration forms effortlessly with its drag and drop builder. Because of the user-friendly interface, even beginners can create amazing user registration forms in just a few minutes.
Even more beginner-friendly is the default form and sample registration plus account page you get upon installing this plugin. Just configure the settings and publish the form on your website.
Not to mention, it provides full support for WooCommerce. It helps small businesses to create WooCommerce registration forms with extra fields, collect user information, and provide their users easy and quick checkout. That makes it the best WoCommerce registration plugin on the market!
That’s just the tip of the iceberg. We’ve highlighted more reasons why you should choose the User Registration plugin:
- Custom form fields
- Beautiful My Account page
- In-built login form
- Assign user roles and capabilities
- Customize front-end messages
- Export and import forms as JSON files
- Send confirmation emails after registration
- Google reCaptcha for anti-spam protection
Pricing: The User Registration plugin is available for free in the WordPress repository. If you’re interested in the premium version, the cheapest plan starts at just $99 per year.
That’s why we’ll be guiding you through the process of creating a WordPress user registration form using the User Registration plugin. Without further ado, let’s get into it!
#1. How to Create a User Registration Form in WordPress? (Easy Method)
Remember how we talked about User Registration’s default form and sample pages? In this section, you’ll learn how to use the default form and sample pages to quickly add a registration form to your website.
Step 1. Enable Users to Register on Your Website (with a Front-end Form)
The first thing you need to do is enable users to register on your website using a form. This option is turned off by default.
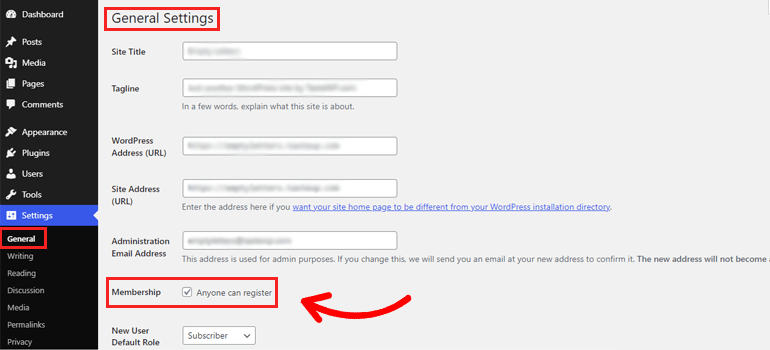
To turn it on, go to Settings on your WordPress dashboard. Then, look for the Membership option under General settings. To allow users to register from a front-end form, tick the Anyone can register option.
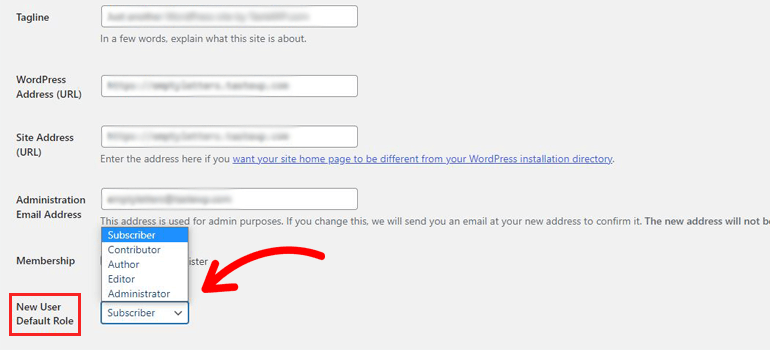
Once that’s done, scroll down to New User Default Role and set it as Subscriber. You can choose other roles depending on the permissions you want to grant to the users. However, be careful about which user role to set as default to avoid misuse of access.
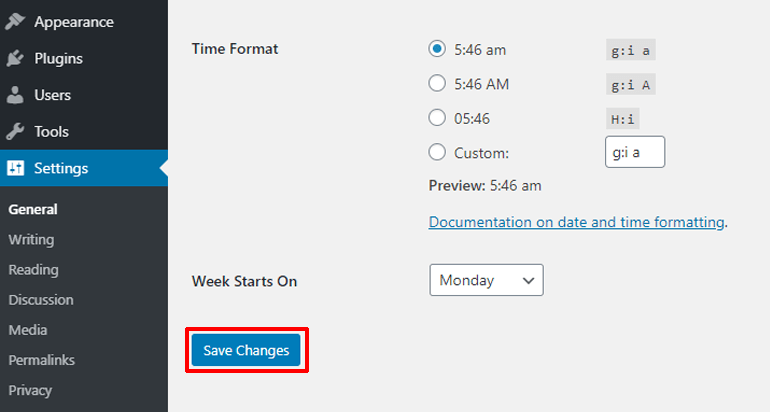
Finally, you can Save Changes and proceed to the next step.
Step 2. Download and Install the User Registration Plugin
Of course, you’ll first have to download and install the user registration plugin before you do anything else. So, download the plugin from here. It will be saved as a zip file on your device.
After that, open your dashboard again. In the Plugins section, click on Add New.
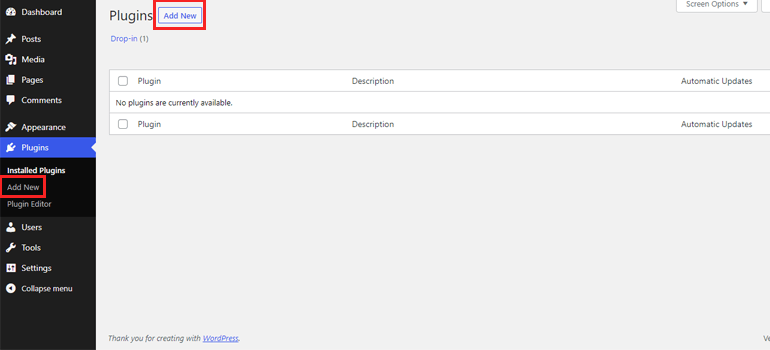
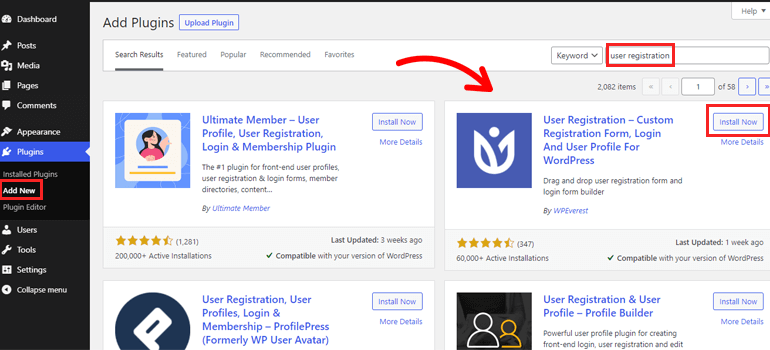
Next, you can simply search for the plugin and install it directly once you find it.
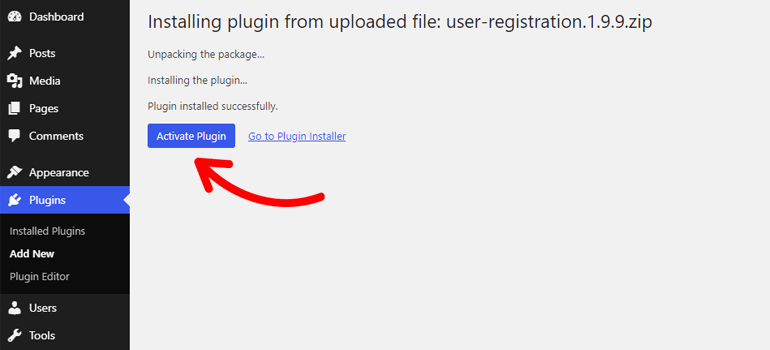
Make sure you activate the plugin as well.
Alternatively, you can use the upload method. It’s useful if you’ve already downloaded the plugin file on your local computer. It’s mainly the case if you purchased the premium version of the plugin.
To install from this method, click on the Upload Plugin option and then select the plugin file in .zip format and click Install Now.
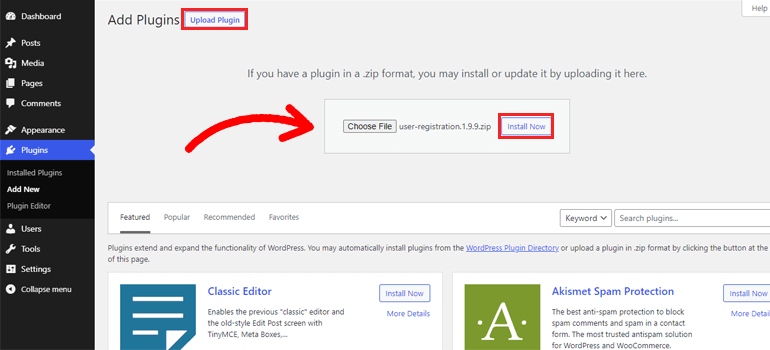
After that, you need to activate the plugin and enter the license keys if you installed the premium version. You can find the license keys in your account area in on plugin store WPEverest.com.
Step 3. Install Sample Pages by the Plugin
The next place the setup process takes you to is the Installed Plugins under the Plugins tab. Here, you can see that the User Registration plugin is now active on your website. The most important thing, however, is to Install User Registration Pages.
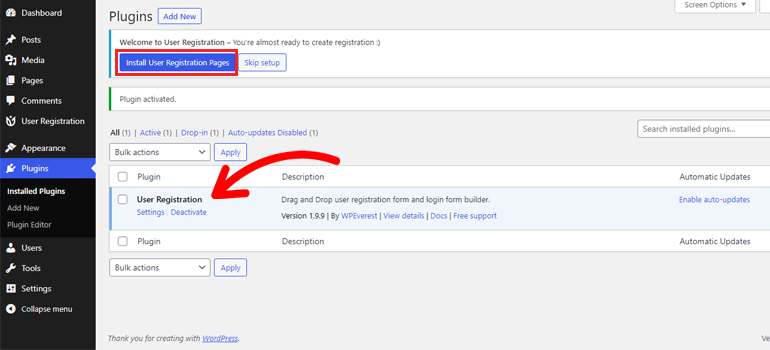
When you hit that button, you get two sample pages on your website: My Account and Registration.
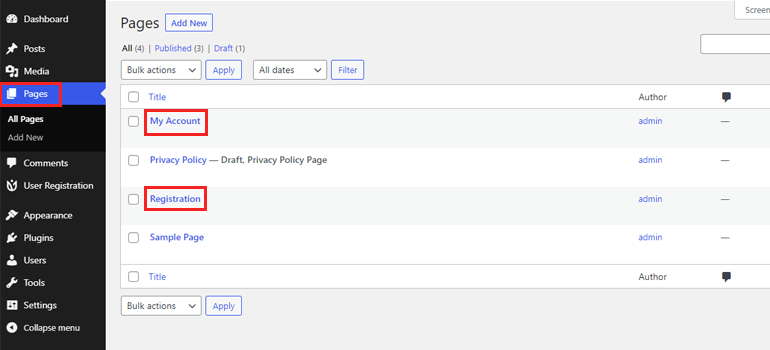
- My Account: The user profile page that each registered user can access after logging in.
- Registration: The WordPress page that displays the Default Form.
But, where’s the Default Form? We’ll discuss just that in the next step.
Step 4. Find the Default Form and Configure Settings
You’ll find a default user registration form right in the User Registration tab. It’s the perfect solution for people who want a simple form without making everything from scratch.
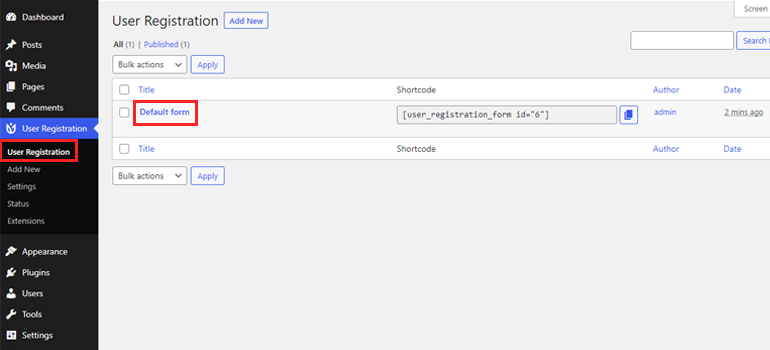
The form consists of 4 form fields: Username, User Email, User Password, and Confirm Password.
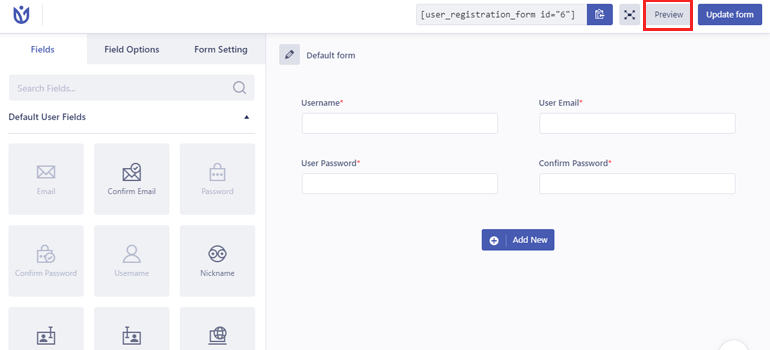
You can check how it will look in the front end with the Preview button.
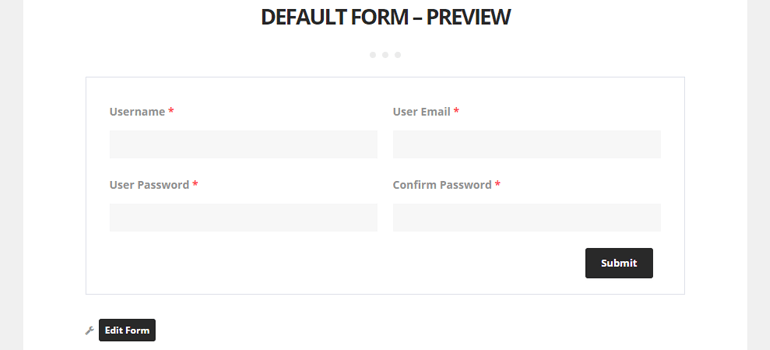
Remember that it might look different for you based on what theme you’re currently using on your website.
Now, all that’s remaining to do is configure the settings for this form. To do that, go to General Settings under Form Setting.
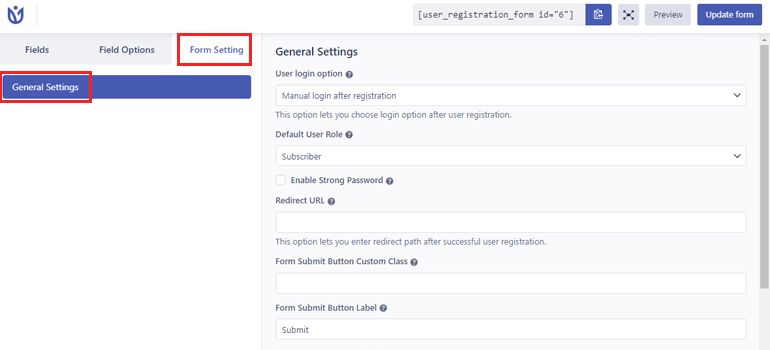
Let us explain each setting, in brief, to help you out.
- User login option: Choose the criteria for login after registration. This can be manual login, automatic login, email confirmation, or admin approval.
- Default User Role: Assign a specific user role to all the members who register using this particular form.
- Enable Strong Password: Enabling this feature means the form asks users for a strong password while registering.
- Redirect URL: Decide which page the user ends up in after successful user registration.
- Form Submit Button Custom Class: Create custom CSS class for the submit button. In the case of multiple classes, separate each class by a comma (,).
- Form Submit Button Label: Type in your own label for the submit button like “Register.”
- Success message position: You can place the success message either at the top or bottom.
- Enable reCaptcha Support: Enable Google reCaptcha in your registration form for anti-spam protection.
- Form Template: Select a template for your form from these five options: Default, Bordered, Flat, Rounded, and Rounded Edge.
- Custom CSS class: This section allows you to add custom CSS classes for your registration form.
So, configure the default form according to your requirements, and it’s ready to be used in your WordPress website.
Step 5. Show the Registration Page on Your Website
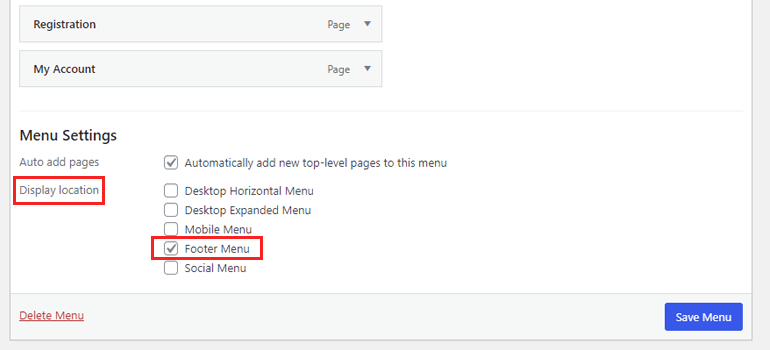
Now, you can display the Registration page on your menu or footer, which will lead your users to the default registration form.
To do this, navigate to the Menus section of Appearance. First, create a new menu in Menu Structure by giving it a name and pressing Create Menu.
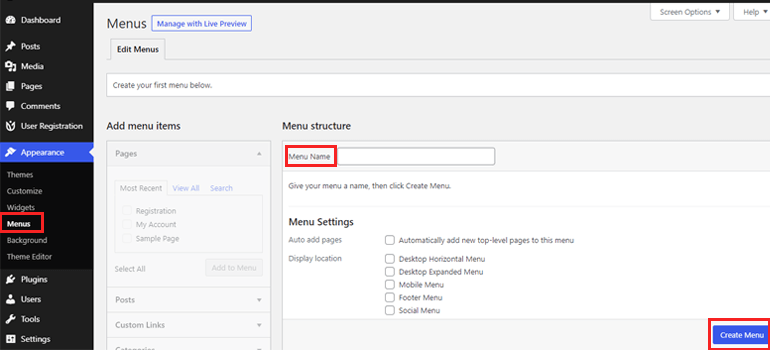
Then, select Registration and My Account from the Add menu items box. Then, click Add to Menu.
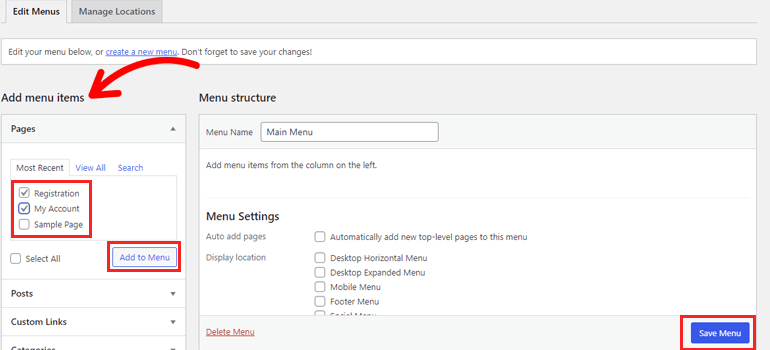
After that, select Save Menu. That’s it! Now, the Registration page link will appear on your menu along with My Account.
You can also place them in the footer of your theme. Just create a secondary menu and set the display location as Footer Menu.
Step 6. Generate User Registration Reports
If you want regular reports on all the user registrations on your site, User Registration has that covered as well. You get daily, weekly, and monthly reports on how many users registered on your site, which device they used to register, and so on.
However, this feature is only available in the premium version with the Extras add-on. We recommend going through User Registration’s pricing plans to learn more about the premium version and what additional features it offers.
#2. Make Custom Registration Form in WordPress from Scratch (Alternative Method)
It’s no surprise that the default form may not be for everyone. No worries! Apart from the default form, you can create unlimited custom registration forms from scratch with User Registration.
To begin with, you need to enable Anyone can register from your General settings. Also, install and activate the User Registration plugin on your site.
For the next steps, please follow the instructions below.
Step 1: Create a New User Registration Form
With the plugin installed, you’re ready to create a custom WordPress registration form. To do that, go to the User Registration tab and click on Add New.
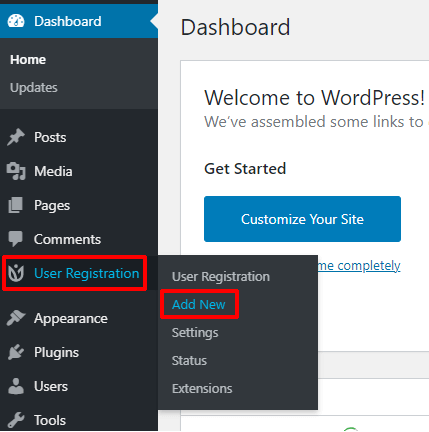
Then, give your form a name by clicking on the pencil icon. As you can see, it already comes with the mandatory form fields: User Email and User Password on the right side of the form builder.
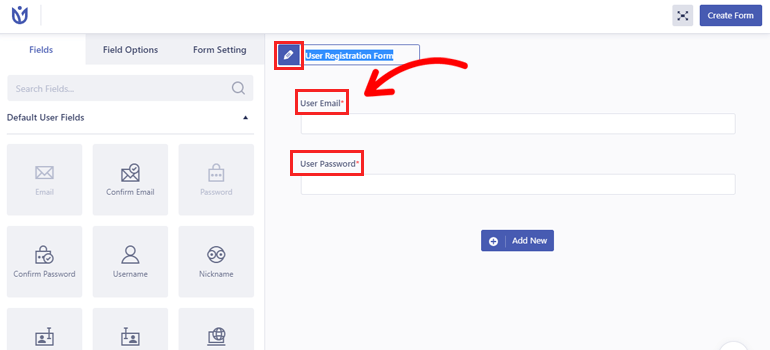
We sidelined the explanation of the form builder in the previous section since we were dealing with the default form. So, let’s start with a short introduction to the form fields.
The Fields tab on the left is divided into 6 sections. Among them, Default User Fields and Extra Fields are available in the free version.
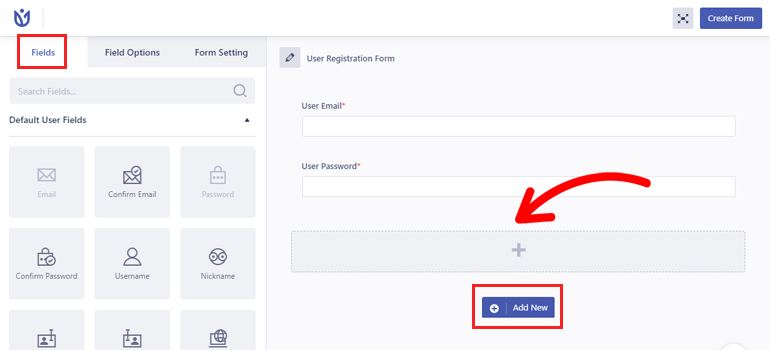
Now, click on the Add New button to add a row to the form.
You can simply drag and drop any field you need into the blank space.
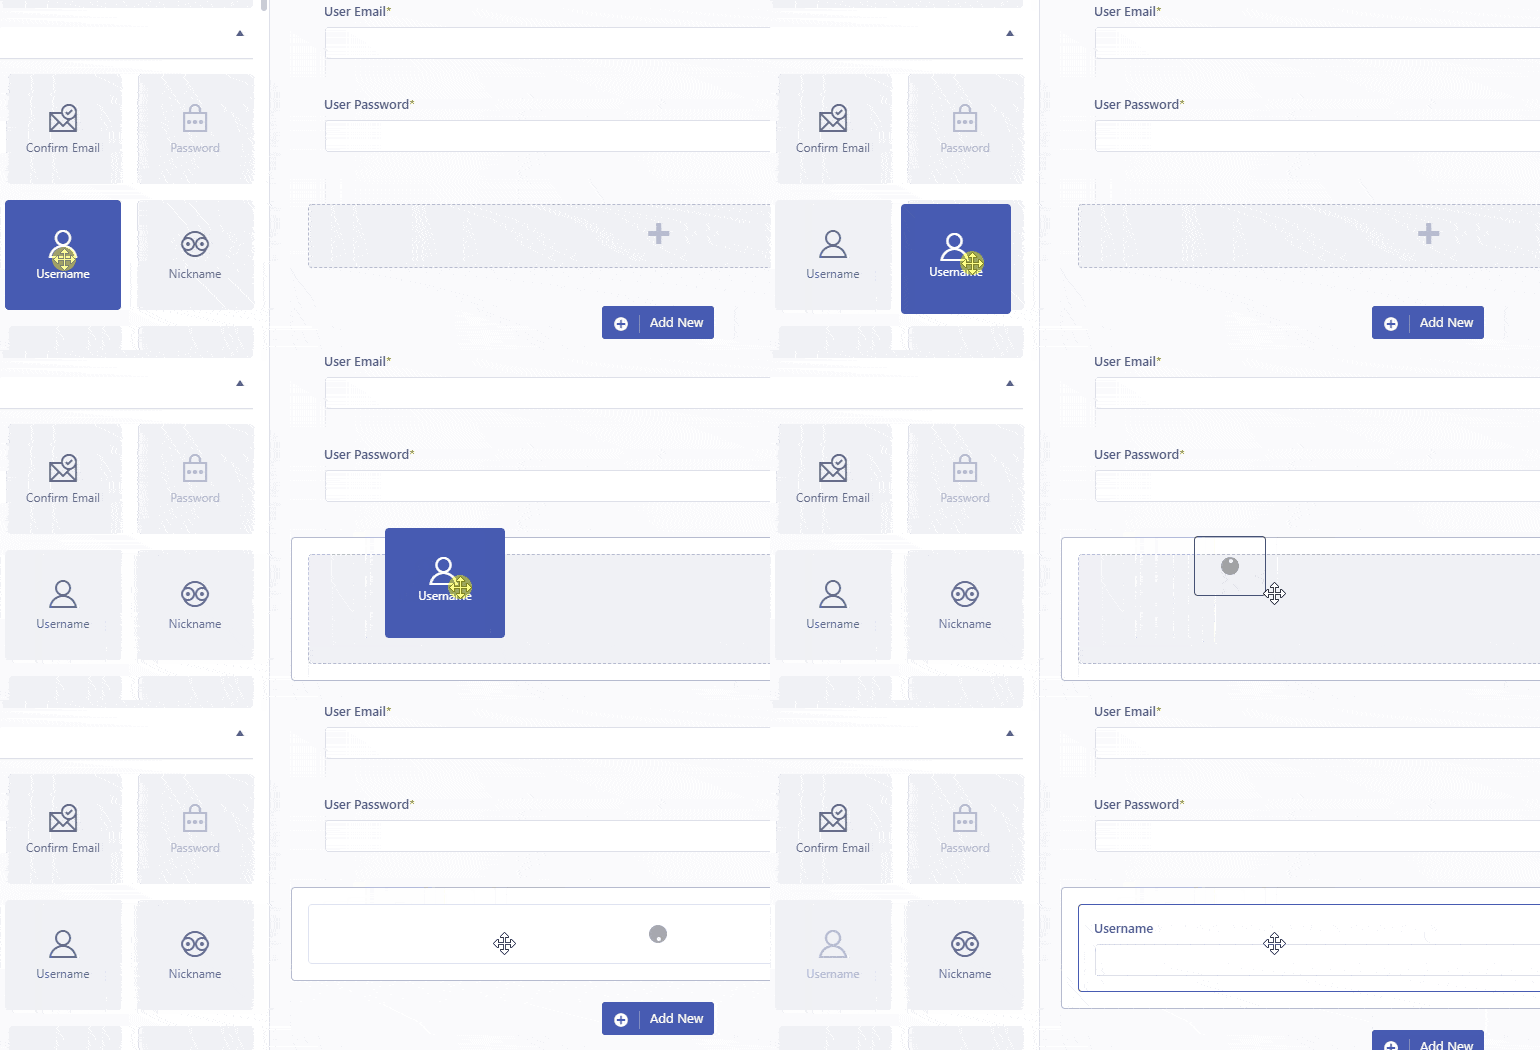
The drag and drop feature makes changing the position of the fields just as easy as ABC.
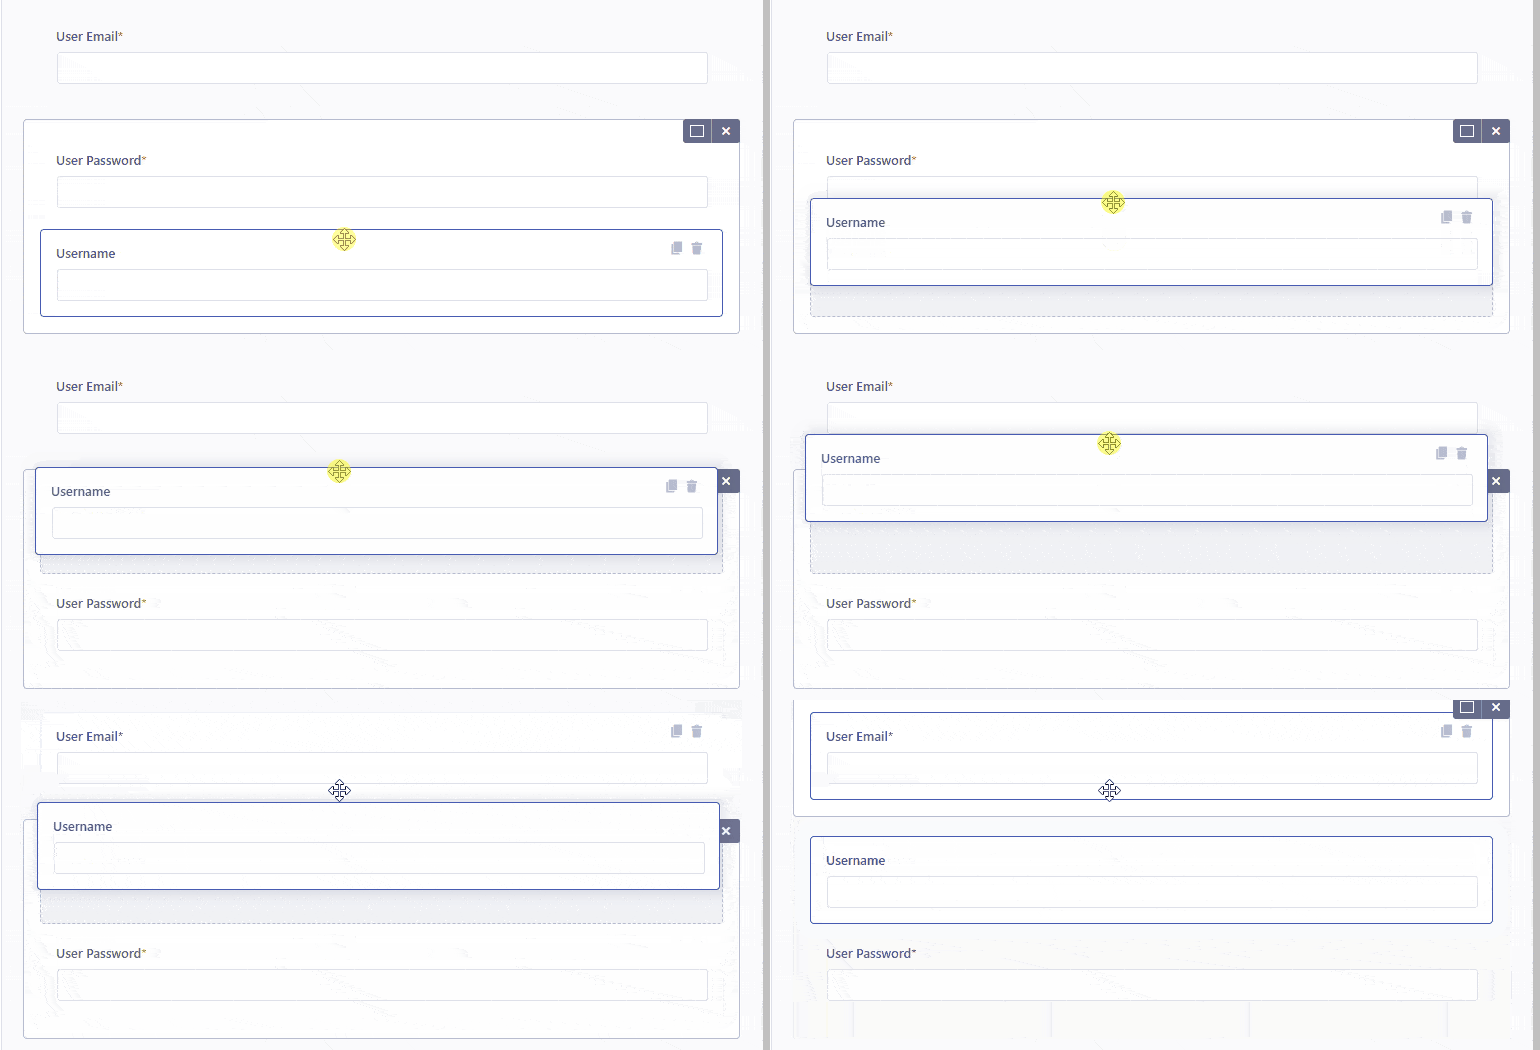
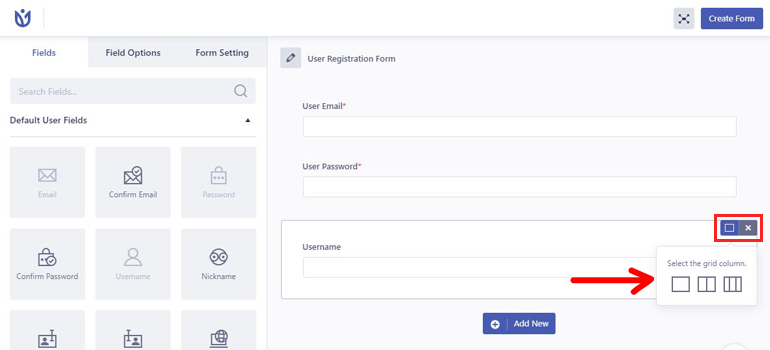
The form builder also lets you change the layout of the row into 2 or 3 columns. And if you need to delete a row, click on the cross icon.
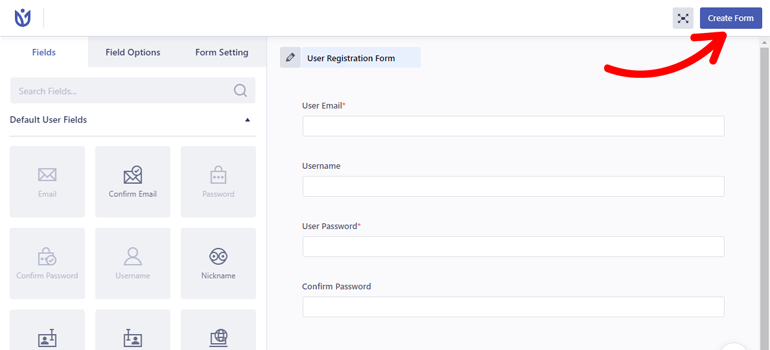
Once you’ve built a complete form with all the necessary fields, hit the Create Form button.
Now, the form shortcode, as well as the Preview and Update Form buttons, appear on the top left. You can copy and paste the shortcode on any page you’d like the registration page to be displayed on.
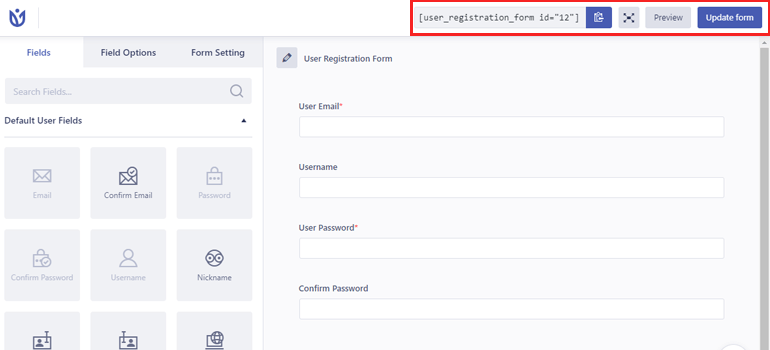
Step 2: Customize Your Registration Form
With the building part done, it’s time to customize your form now. Simply click on the field you want to edit, which in turn displays the Field Options of the field.
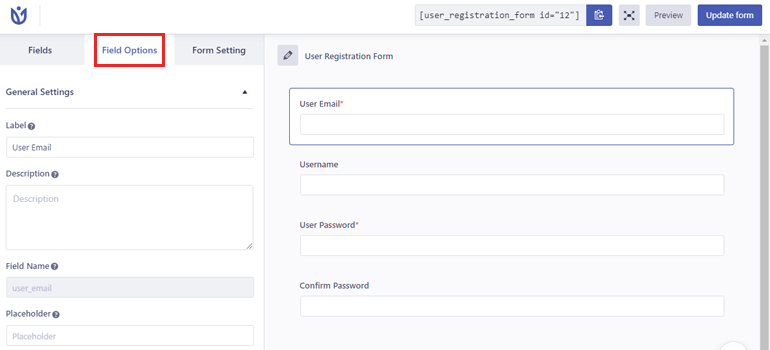
From here, you’ll be able to make changes to the General Settings and Advanced Settings.
- General Settings: Edit the Label, Description, Placeholder, Required, and Hide Label options for form fields.
- Advanced Settings: Add custom CSS classes, set minimum or maximum values, choose a date format, and more.
No doubt that the Field Options are pretty easy to understand. So, you should have no problem customizing your form without a hitch.
Step 3. Configure Registration Form Settings
The next step is to configure the General Settings under Form Setting. You can set default roles, user login options, redirection URL, and so much more. You’ll find more about the Form Setting in the default form section above.
Oh, and don’t forget to Update Form to save all the changes you made.
Step 4. Configure User Registration Plugin Settings
Furthermore, you can visit the User Registration’s Settings tab to make changes to the plugin itself.
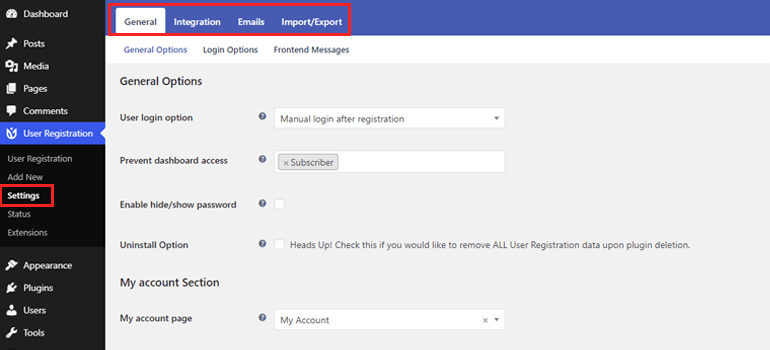
There are 4 tabs in the free version: General, Integration, Emails, and Import/Export.
- General: From here, you can restrict dashboard access plus customize My Account, login options, and front-end messages.
- Integration: Enable spam protection for your forms with two versions of Google reCaptcha.
- Emails: Customize email notifications for your registration forms and email sender options. You can also disable email notifications entirely if needed.
- Import/Export: This setting allows you to export user data as CSV files. Plus, you can import/export forms as JSON files.
Make any changes you see necessary to the plugin settings, and you’re good to go.
Step 5. Display the Registration Form on a WordPress Page
Now, here’s the important part. You need to display the registration form you just made on your site.
All you need to do is simply add the User Registration block and choose the form.
Create a new page or open a page to edit. For example, we created a new page called ‘Join Us Now’. In the page editor screen, search for the User Registration block and click on it.
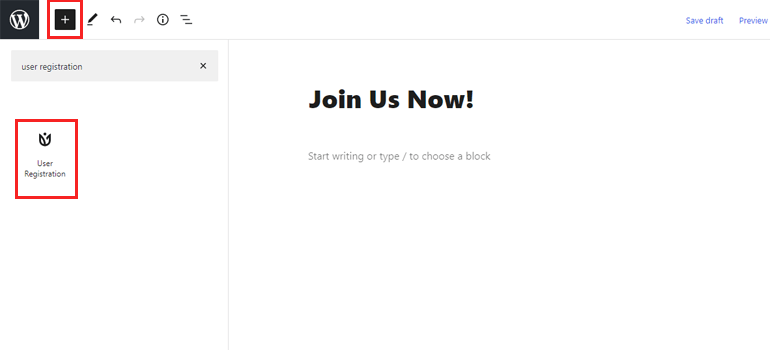
Then, select the registration form you want to display from the dropdown.
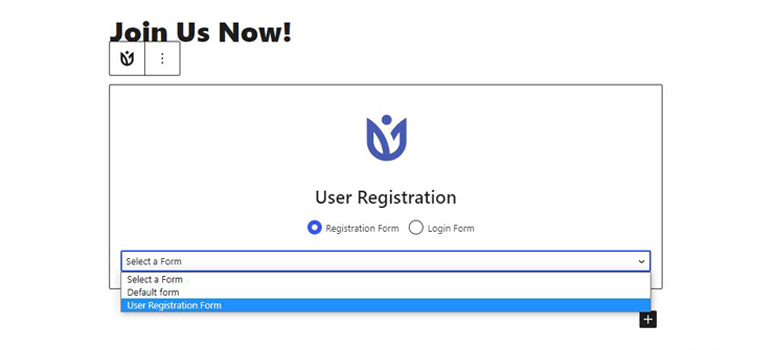
Since the plugin comes with an in-built login form and My account page, you can display them on any page the same way.
Finally, Publish the user registration form to enable users to easily register on your website.
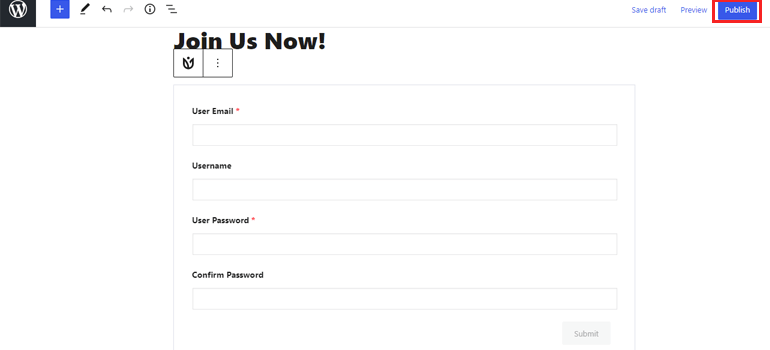
Alternative Way: Add User Registration Form with a Shortcode
You can also add the custom user registration form on any WordPress page by using a shortcode.
All you have to do is copy the form shortcode from the top of the form builder.
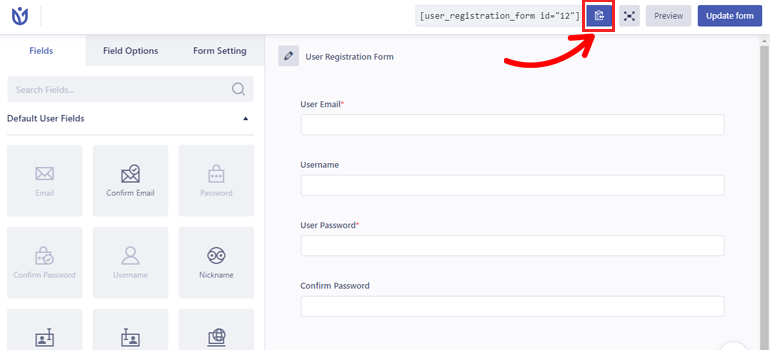
Then, head over to the page or post where you want to insert the form. In the block editor, paste the shortcode in the Shortcode block.
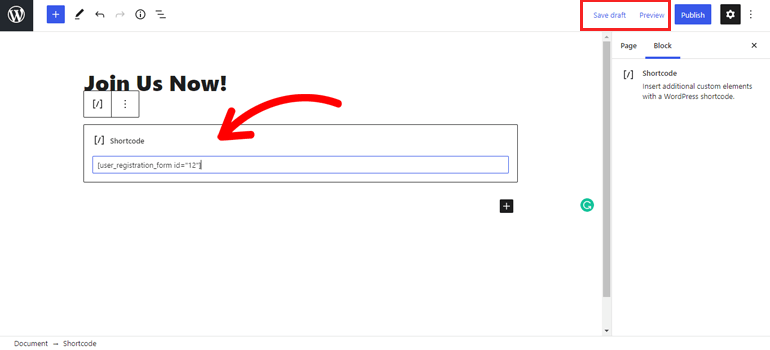
Click Save Draft and then Preview to see how it looks.
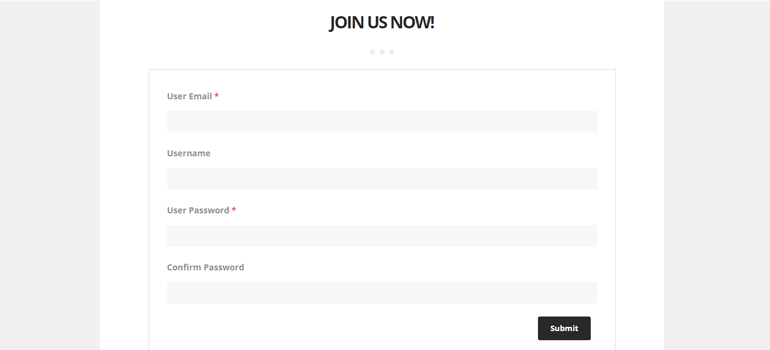
Finally, hit Publish to display the form on that specific page or post of your WordPress site.
Step 6. Generate User Registration Reports
As we said before, you can generate reports for every custom registration form you create on your WordPress website. You can analyze this collected data and implement the findings into your future business plans. But only as a premium member of the plugin will you be able to use this feature.
If you’re interested, check out the official User Registration website and become a premium member.
Conclusion
That wraps up our easy guide on how to create a custom user registration form in WordPress. Yes, WordPress comes with a default user registration form. But why limit yourself to that option when there’s so much more you can do with plugins.
Creating custom user registration forms is such an easy job with a plugin like a User Registration. Even with the free version, you get a default form, sample pages, tons of form fields, and customization options.
So, we highly recommend User Registration to anyone looking to place beautiful registration forms on their website.
Registration form is just one of many types of forms. You might need forms like donation forms and online booking forms, depending on your niche. So, we suggest going through our blog to learn more through similar articles.
Also, don’t forget to share this article with your friends on social media.






![Zakra 3.0 | Zakra Pro 2.0 Release [Major Updates!]](https://i.ytimg.com/vi/g3rifl7kWvg/maxresdefault.jpg)