Wanna create a login and registration page in WordPress? We got you covered.
Login and Registration pages in WordPress are used to provide your website visitors with special access to certain parts of your website. You can elevate different aspects of the user experience for your visitors. And, you can choose certain membership benefits to promote your business.
The most common way to create and add a login and registration page in WordPress is using different plugins. The registration plugins in WordPress help you create login and registration forms with ease. Plus, they provide additional functionalities like payment integration, password recovery, account page, and more.
Let’s learn how we can create a custom login and registration page in WordPress via this article. We will also tell you why you need a login and registration page in WordPress
Why Create a Login and Registration Page in WordPress?
Login and registration pages in WordPress are a popular part of your website. Especially if your website is about services or products. In these cases and many others, you don’t want everyone to access every part of your website.
Moreover, you can provide users with their account page, where they can manage the services and products they like. Much like the account page on WPEverest which will safely keep all your products and license keys for you.
By creating a login and registration functionality in WordPress, you get to choose what the registered users get to see or edit what content. This opens up several possibilities. You could work on your website with strangers without worry, turn your website into a business or social platform, like Twitter.
Apart from this, you can also enjoy other features. For instance, you’ll be able to send automatic emails to the users about your new products or services, if they have registered to your site.
How to Create a Login and Registration Page in WordPress?
The most common way to create a custom login and registration page in WordPress is through a plugin. So the first thing to do is to install a plugin. And the best plugin for the purpose is the User Registration.
User Registration is simple to use, yet powerful enough to create any kind of login and registration page. It has an easy learning curve and the drag-and-drop feature makes creating login forms a piece of cake.
Some of the notable features of the User Registration plugin, that tempt the recommendation are:
- Google ReCaptcha for spam-protection
- Prebuilt sample login and My Account Page for users
- Assign User Roles from the form directly
- Create beautiful and fully responsive login forms
- Drag and Drop feature for form building
We have WordPress, and we have the User Registration plugin. What are we waiting for? Let’s jump right into our main topic.
Step-1: Installing the User Registration Plugin
First, log-in to your WordPress dashboard. WordPress dashboard is usually accessed by adding /wp-admin at the end of your website’s URL.
If you haven’t logged in to your website’s dashboard, you’ll see something like this.
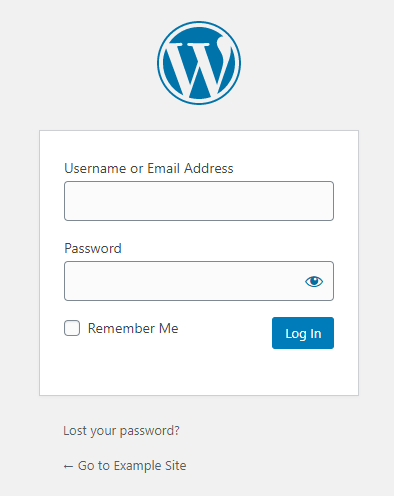
You must be familiar with this since you’re familiar with WordPress. This is the login page in WordPress. WordPress created this login functionality to give you a unique place and credentials in the WordPress world. You can’t get to someone else’s website and others can’t get to yours.
A big takeaway from this is the concept. Login and Registration functionality on your website will use the same concept.
And now, log in to your website’s dashboard.

Now that you’re logged into your dashboard, go to Plugins >> Add New, from your WordPress Dashboard menu.
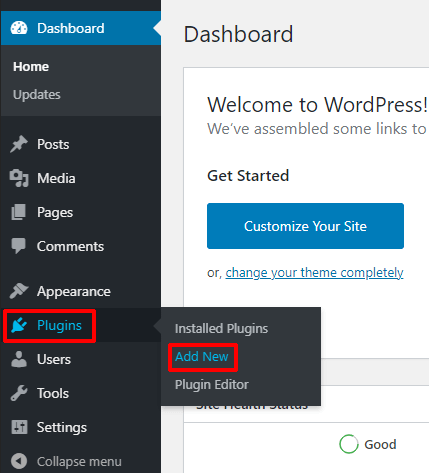
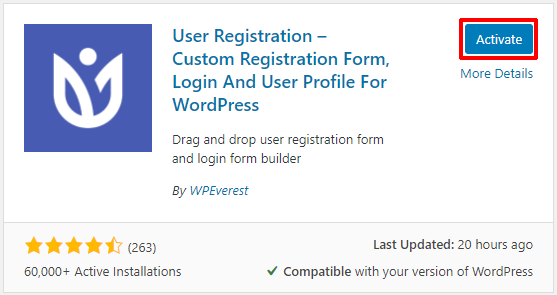
You’ll be taken to the plugins repository of WordPress. From here, you can add new plugins to your site. In the search bar, type User Registration by WPEverest. Hit Install on the first plugin that shows up.

After the plugin is installed, click on the Activate button to activate the plugin.
And that’s it. You’re ready to create the WordPress login and registration form.
Step-2: How to Create Login and Registration Form in WordPress
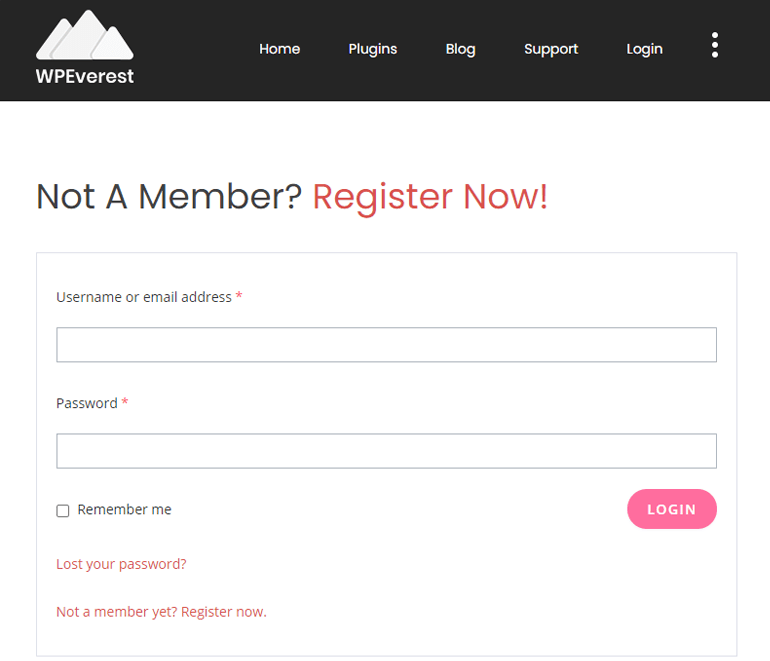
Before we start creating login and registration forms, let’s first look at the sample that the User Registration plugin provides.
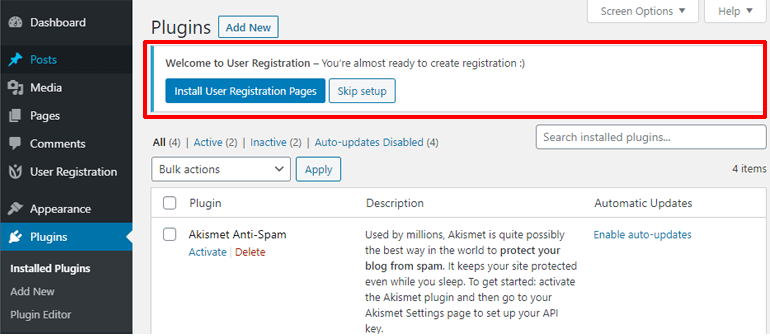
Once, you install User Registration, you’ll see a Welcome message at the top of the WordPress Dashboard saying ‘Welcome to User Registration – You‘re almost ready to create registration :)’. In that message click on Install User Registration Pages.
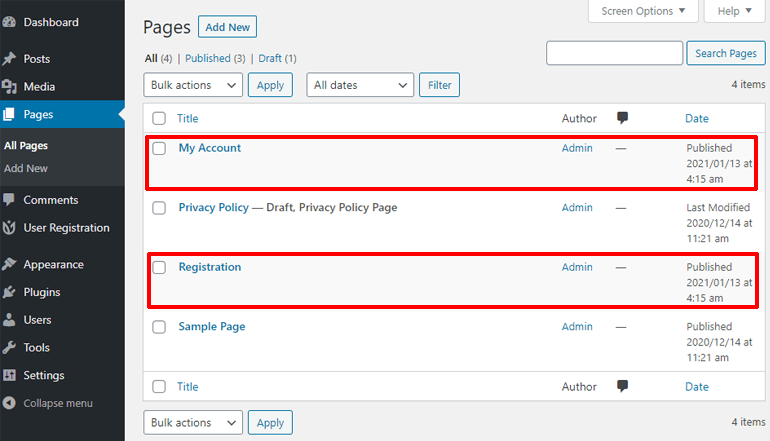
After you click on Install User Registration Pages, User Registration will automatically create two sample pages for your website: My Account and Registration page. You can edit them like any other page.
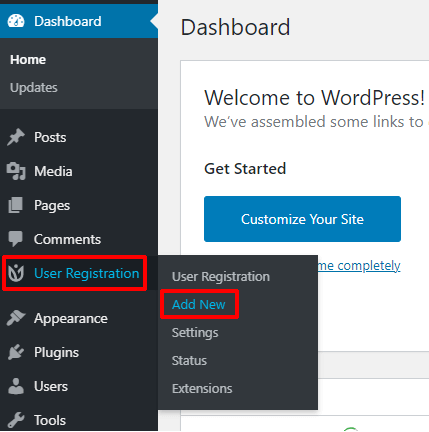
And, User Registration will create a default registration form for your website. To edit the form, go to User Registration >> User Registration.

Hover over the form and click on the little blue Edit button to edit the form.

You will be taken to the form editor window of User Registration. This is where you can manage the looks and settings of your Registration form.
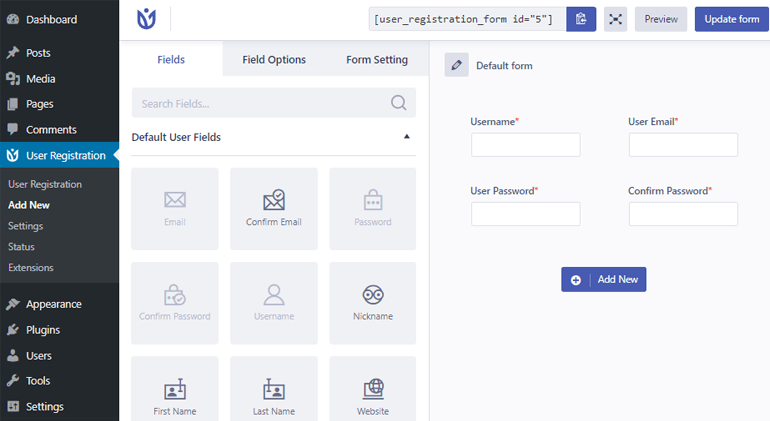
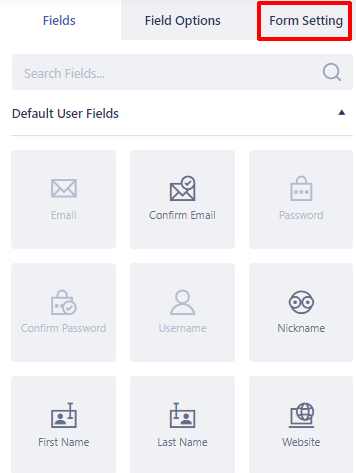
You can see different fields to add on your left. And on your right is the registration form where you drop the fields to add them.
Adding fields and rows to Your Registration Form
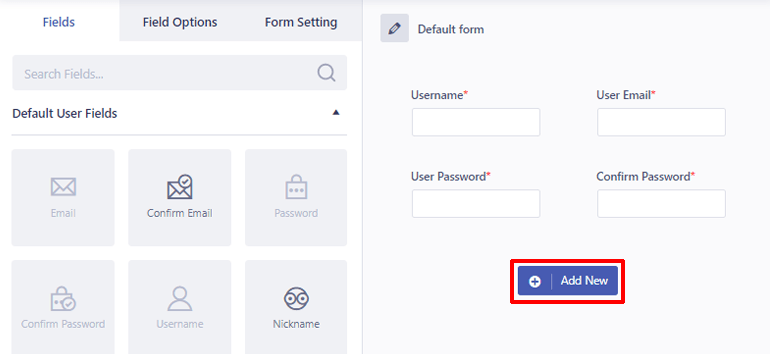
To add a field to your form, simply drag the field from the left and drop it on the right.
If you ever run out of rows to add a field, click on the Add New button on the right to add more rows.
The free version of User Registration will allow you to use the basic fields required to create a Registration form. If you want to create a login and registration page in WordPress with advanced fields, you’ll need to upgrade your plans.
Once you do upgrade your plans, you will unlock a whole new world of features and functionalities.
Back to our registration form, you can change the name of your form by clicking on the pencil icon on the top.
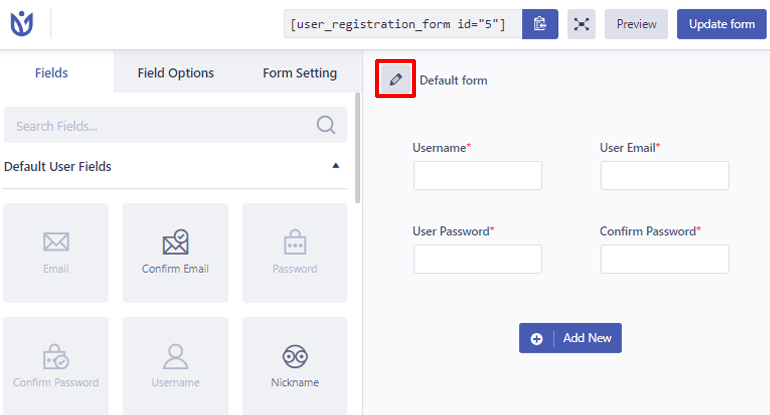
And, to rearrange your rows, you can simply drag the row and drop it wherever you want it to be. The same goes for the field.
One thing to note here is that, when you hover your mouse over a field, the outer line represents the whole row. While the inner line represents an individual field.
You can add and manage your fields this way to create a form suitable for your site.
Editing Field Options in Your Registration Form
We have learned to add and manage the fields in our form. But that’s not all. The Field Options tab on the left section will allow you to edit settings for an individual field. So click on a field you want to edit and then on the Field Options tab.
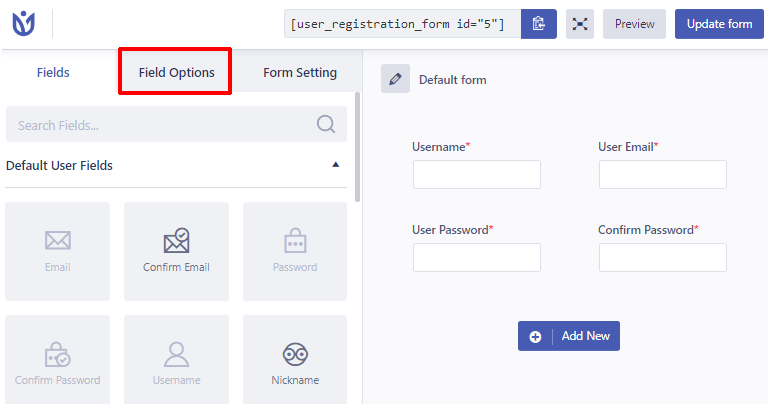
Under the field options tab, you’ll see different options to edit your field. The settings are divided into two categories, General and Advanced.
The most common General Settings include:
- Label: Edit the name of your field to appear.
- Description: Describe your field
- Placeholder: A text that’ll appear in your field until users give their input
- Required: Set this to yes if you want your field to be mandatory
- Hide Label: Hide the name of your field

Under Advanced Settings, you can provide a custom CSS class for your field.

These field options will help you make your form look even more professional.
Configuring Form Settings
We edited the settings for individual fields. What about the whole form? For that, we’ll have to check another tab named Form Settings.
Inside the Form Settings tab, you’ll be able to change different settings for your form.
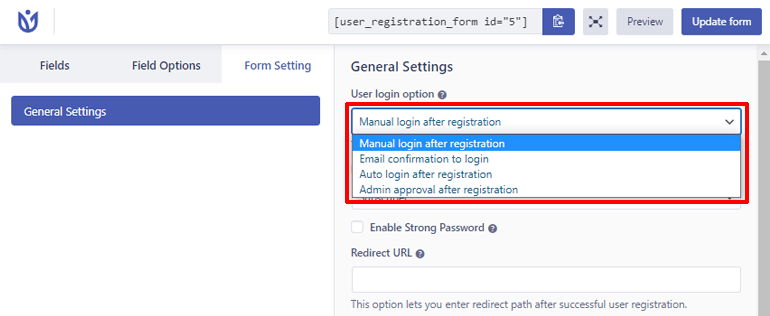
The User Login Option is for what happens to user login after registration. There are four options. By default, it’s set to Manual Login after registration. This will require users to log in manually after registration.
Other options include Email Confirmation to log in, Auto Login After Registration, Admin approval after Registration. The options are self-explanatory. Feel free to check them out.
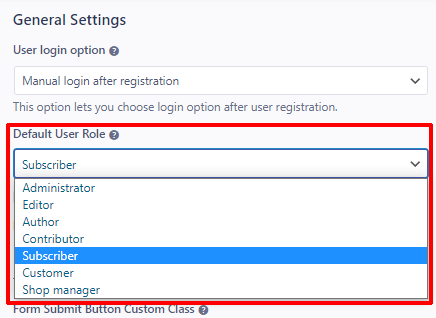
The next option is the Default User Role. Using this option, you can choose what role your users get after they register. It’s set to Subscriber by default. But there are other roles like Editor, Author. If you have WooCommerce, User Registration will create new roles like Shop Manager, Customer, for your online store.
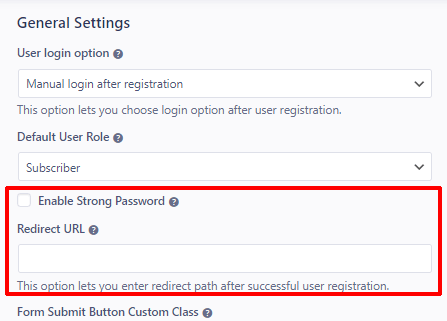
Checking the Enable Strong Password will make your website ask users to use a strong password.
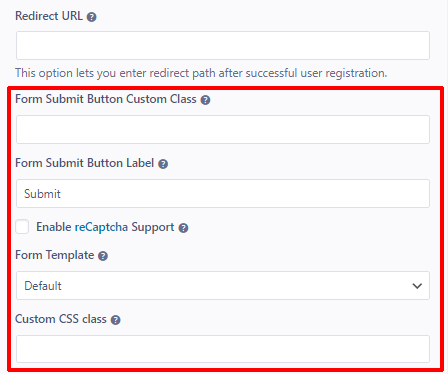
Under the Redirect URL option, you can choose what webpage your users will be redirected to after their registration is successful.
You can provide Custom CSS Class for your Submit button under the Form Submit Button Custom Class option.
You can change the text of the submit button by editing the Form Submit Button Label option.
Moreover, you can also protect your website from bots and spammers by checking the Enable reCaptcha Support option.
The Form Template option lets you change the overall look of your form. There are five templates including rounded, flat, bordered, etc.
Lastly, you can provide your form with a Custom CSS class using the Custom CSS class option.
Don’t forget to click on the Update Form button on the top right corner to update your changes.
Up until now, we’ve been editing the default form provided by User Registration. If you want to add a new form to your site, go to User Registration>>Add New.
You’ll be given a basic login form, which you can edit to your liking. Once you’re done editing, click on the Create Form button on the top right corner to save your form.
Step-3: Creating Login and Registration Pages on Your Website
We have created the login and registration form for our WordPress website. But it doesn’t appear on any pages. That’s because we haven’t created pages for them yet. So let’s do that.
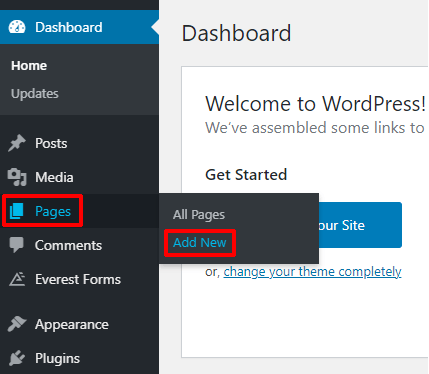
Firstly, go to add a new page, Pages >> Add New from your WordPress dashboard.
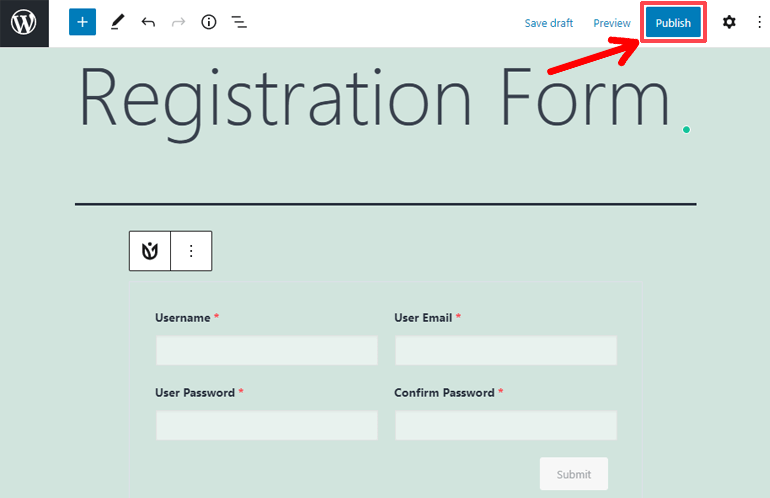
This will take you to the page editor in WordPress. After you’re on the page editor, give your page a title. And click on the little plus button to add a block.

This will show you some blocks you can add to your page. You can see a block named User Registration. This is because User Registration created a block so that you easily add the form to your site. Click on it.

After that, the User Registration’s block will be added to your page. From the radio button inside the block, choose your registration or login form.
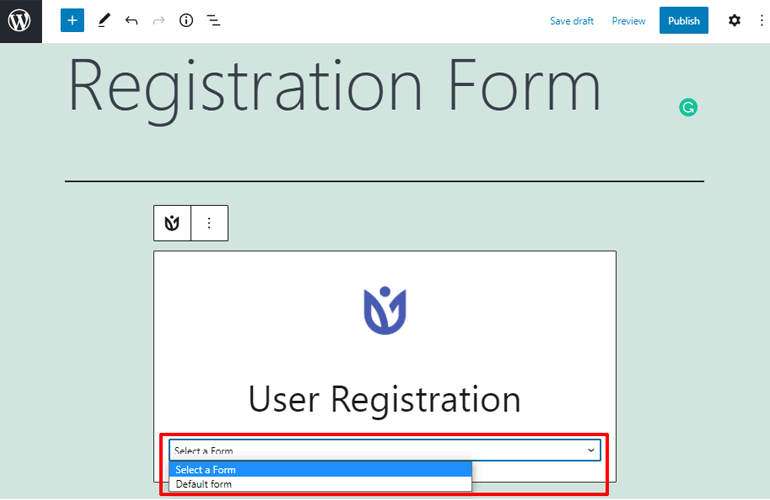
Lastly, hit the publish button on the top right corner to publish your page.
That’s it. That’s all you need to do to add your form to your page.
Step-4: Allow Users to Register on Your WordPress Site
Your form is done, added to a page and you edited all the settings. But WordPress is concerned about your website’s security. So your users will still not be able to register to your site.
To allow your users to register, you’ll have to manage the settings of your website first.
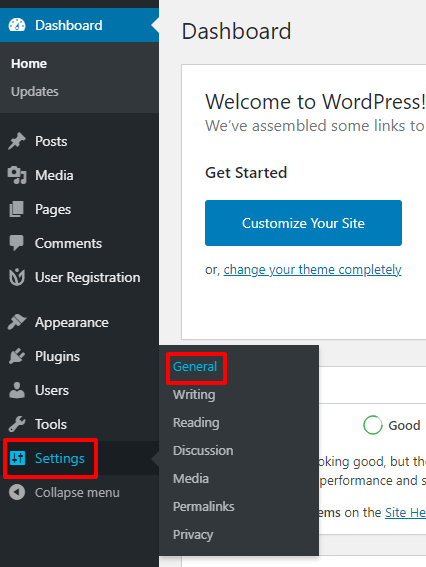
So head over to Settings >> General.
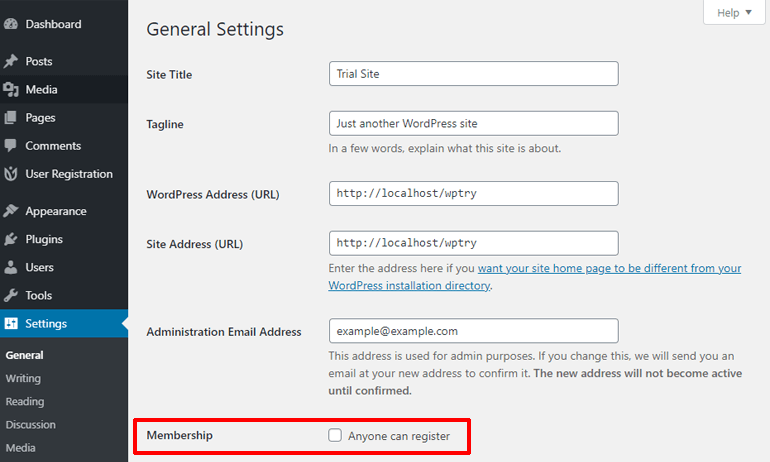
Scroll down, and in the Membership option, check Anyone Can Register.
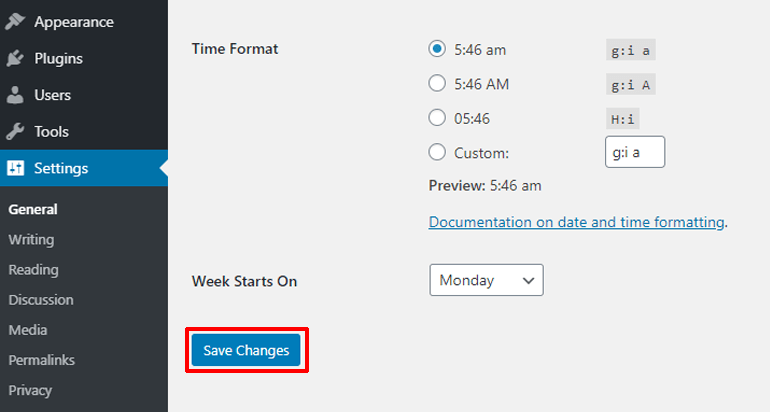
Hit the Save Changes button at the bottom of the page to save your change.
Your users will finally be able to register to your site and enjoy your content.
Step-5: Adding the Login Form to Your Website
Up until now, we’ve focused on letting the users register. But, what after that? They will have to log in after they register. So how do we create a login page in WordPress after the registration page?
Well, you don’t have to do much in this case. Because User Registration already created a login form for your website. All you have to do is now put that form on a page.
So, go ahead and create a new page.
To do this, go to Pages >> Add New. Give your page a title.
After that paste this short code: [user_registration_my_account] in your page. You can find this short code in the documentation of User Registration.
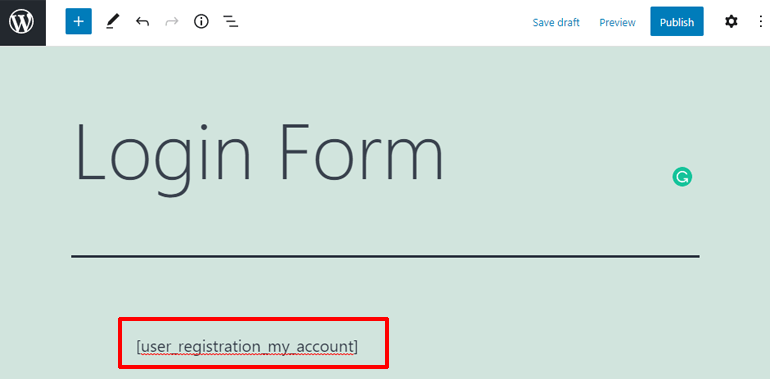
After you paste the short code, your login form will be added to the page.
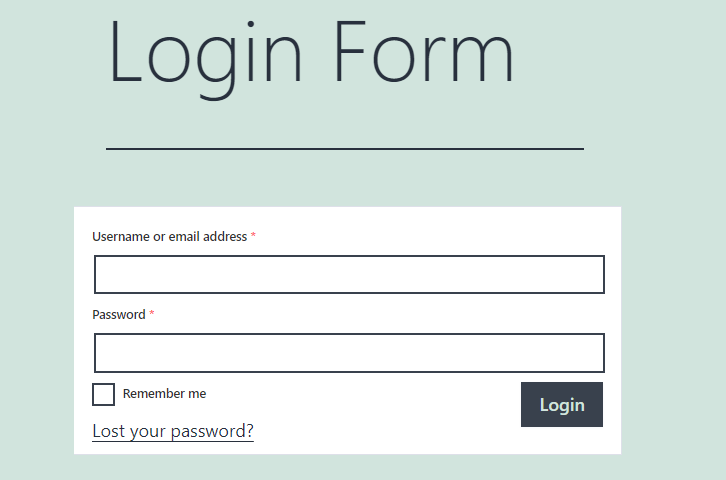
Finally, publish your page by hitting the Publish button.
Done! Logging your users in? Solved.
Step-6: Adding your Registration and Login Pages to Your Website’s Menu
Creating registration and login pages in WordPress is solved. But we gotta make it as easy as possible for your users to access the pages. So, let’s add those pages to our website’s menu. That way, users can easily access the login and registration page from anywhere on your site.
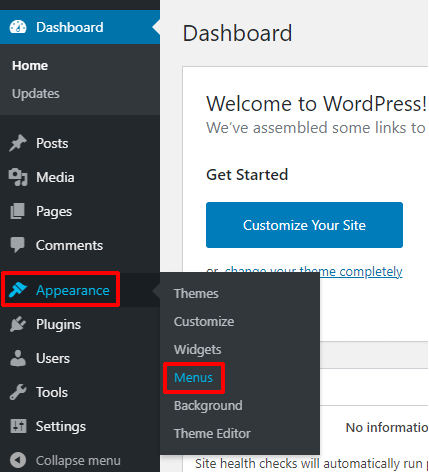
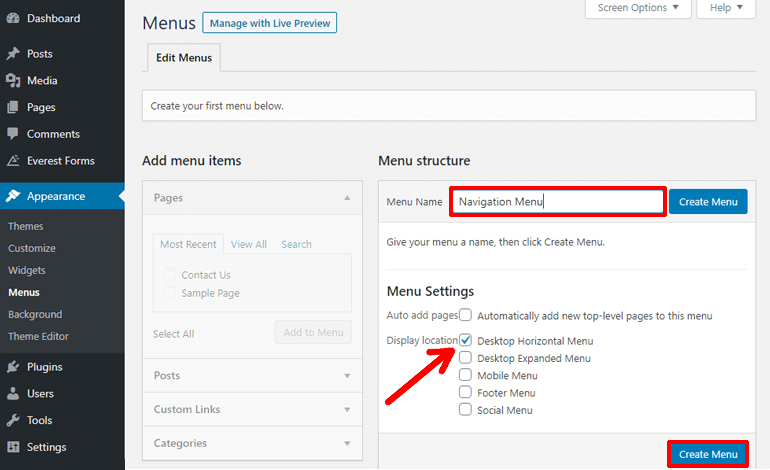
Head over to Appearance >> Menus in your website’s dashboard. This is where you can manage your menus from.
Select a menu you want your page in, from the radio button on the top.
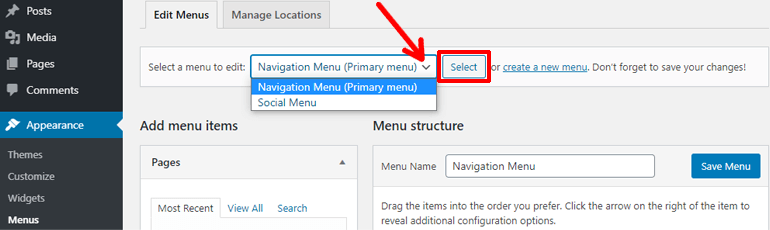
If you don’t already have a menu, you can create one. For that, type a name on the name bar on the right and click on Create Menu.
To choose a location for your menu, check the box that says the name of the location.
After you create a menu or select one, time to add pages to your menu. To do that, click on the pages pane on the left.
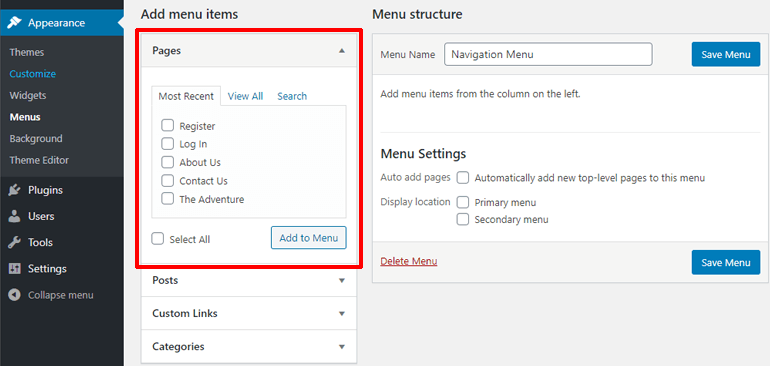
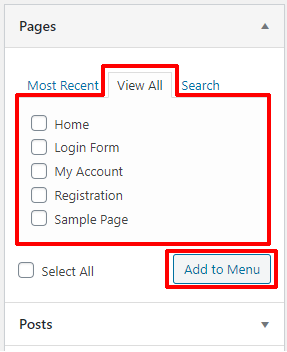
By default, only your recent pages will be shown. To view all pages, click on the View All button.
After that, check the pages you want to add to your menu, and hit Add to Menu.
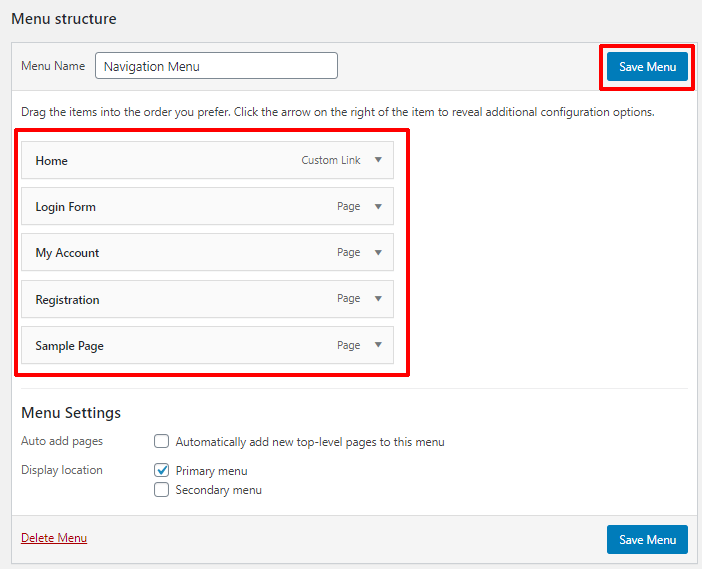
You can see your pages being added to your menu on the right, under the Menu Structure section. Finally, hit the Save Menu button to save your menu.
Congratulations! You have successfully created login and registration pages in WordPress and added them to your menu.
Configuring Settings of User Registration Plugin
User Registration has a Settings tab that’ll let you configure its settings. With these settings, you can have more control over your login and registration pages.
To start configuring the settings of User Registration, head over to User Registration >> Settings.
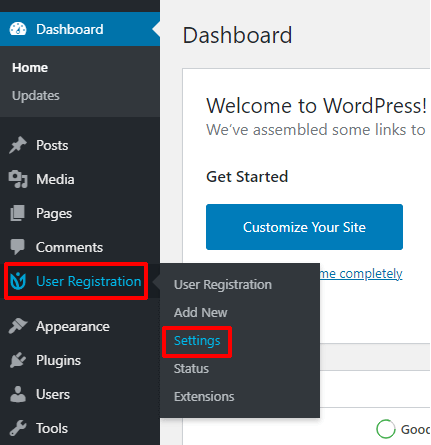
There are settings for individual functionalities. They are divided into four tabs, General, Integration, Emails, Import/Export.
Under the General Settings, you have options to edit dashboard access, uninstall option, layout, etc.
You can also change the endpoints of your form. Endpoints are much like URL slugs, that handle a specific function of your registration form.
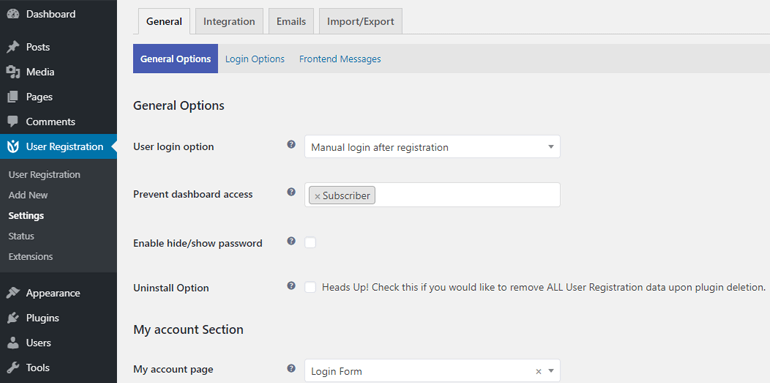
Many of the settings you find here are settings you can configure from inside the form editor. For instance, options like a form template, placeholders, labels, can be configured directly from the form editor.
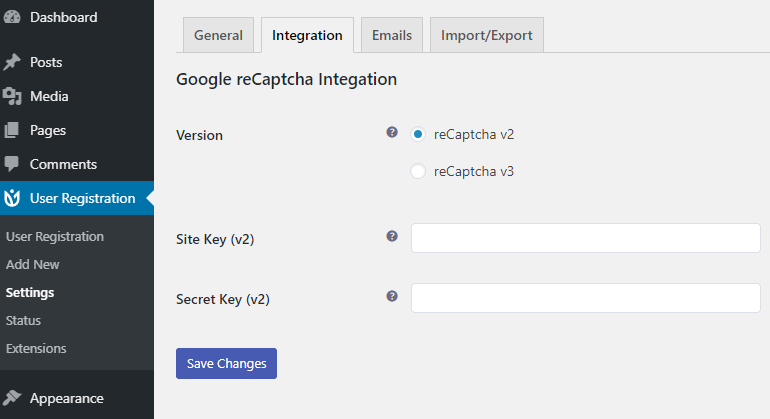
Under the Integration tab, you can configure the functionalities integrated into your plugin. In the free version, you have the reCaptcha integration. You can choose the version of reCaptcha from here.
The next tab is about Emails. From here, you can change the email to be sent after successful registration, request for a password reset, and more. You can even disable emails by checking the Disable emails option.

The last tab is for importing and exporting data. With this tab, you can export your user data as a CSV file. You can also import or export your forms as a JSON file.

We only showed you the surface about configuring User Registration. Now it’s up to you, to use these to power your login and registration pages.
Doing More with User Registration
What we read above was a fraction of the functionalities User Registration provides. With different addons available in User Registration you can make your registration form more awesome.
Some of the best addons in User Registration include:
- Style Customizer: Customize your form’s style with WordPress Customizer like interface
- Social Connect: Allow your users to register or login to your site with social platforms like Twitter, Facebook, etc
- WooCommerce: Allow shipping and billing fields to be used in the registration form
- Conditional logic: change the behavior or visibility of one field according to the input in another field
- Payments: Integrate PayPal into your form for payments, donations, and more
- Geolocation: Collect geolocation data like country, zip code, from users who registered on your site
- Zapier: Integrate your form with a large collection of web applications and functionalities
There are more cool addons in User Registration like Content Restriction, multi-part forms, and more. And the best part is, you don’t have to pay for them individually. The addons are provided under different plans of User Registration.
Wrapping Up
Creating a Login and Registration page in WordPress is very easy. It’s made even easier with some of the best plugins like User Registration. Allowing your users to log in to your website will give you more control over who can do what on your website.
Furthermore, you can also turn your website into an online store, social platform, or more. With functionalities like Social Connect, you can let your users register using social media as well.
We hope that we made it easier for you to create a login and registration page in WordPress. If you agree, consider sharing this article.
And since you’re on the topic of creating a login and registration page in WordPress, how about an article on creating multi-step registration form in WordPress?


![Zakra 3.0 | Zakra Pro 2.0 Release [Major Updates!]](https://i.ytimg.com/vi/g3rifl7kWvg/maxresdefault.jpg)
How do I make so that the “registration” and “login” buttons are not shown in the menu to logged in users?
This is the article I was looking for. Thank you very much for your cooperation. Can you tell me what software you use to run an incredibly fast website? Also, I’d like to create a simple website for my business, but I don’t have a domain and I need help with hosting. According to reports, Asphostportal has an excellent reputation. Are there any other options? If so, what would you suggest?