A common way of securing the registration and login process is to add CAPTCHA to the registration form in WordPress.
Security is a factor you can’t ignore when it comes to WordPress registration and login forms. After all, you must make sure your users’ accounts and your website are protected from security threats.
Adding CAPTCHAs to both registration and login forms is easy and effective in securing your site from external attacks. But you might be wondering how you can do this?
Well, all you need is the incredible User Registration plugin. We’ve prepared a detailed guide on how you can add CAPTCHA to registration forms in WordPress with the User Registration plugin. So, stick till the end to learn all about it.
What is CAPTCHA? Why Add it to Registration and Login Forms?
The Completely Automated Public Turing test to tell Computers and Humans Apart, better known as CAPTCHA, is a tool designed to determine whether a user is human or a bot.
This test tells humans apart from computers by analyzing various aspects of user interactions. The way a CAPTCHA works depends on the type of CAPTCHA a system uses. A few popular ones in use today are:
reCAPTCHA v2: reCAPTCHA v2 requests users to tick the “I am not a robot.” checkbox or complete image CAPTCHA challenges. The system analyzes the user’s actions to verify whether the user is a human or a bot.

reCAPTCHA v3: This version of reCAPTCHA evaluates the way users interact with your website. It then generates a score indicating how genuine or fake the user is. A higher score means the user is more likely to be human.
Unlike reCAPTCHA v2, it works in the background. So, your forms won’t display image CAPTCHAs or “I am not a robot.” checkboxes.

hCaptcha: hCaptcha is quite similar to reCAPTCHA. The only difference is that hCaptcha doesn’t sell user collected data to third parties.
Now, the primary purpose of CAPTCHAs is to protect a website from spam and data extraction. This protection extends to registration and login forms if you add the CAPTCHA to the forms.
Hence, with CAPTCHA protection in registration and login forms,
- You can avoid spam registrations to ensure that only genuine or human users are registered on your site.
- You can prevent bots from accessing your website’s comment and review section by filtering out the spam registrations.
- You’re able to protect the user accounts of existing human users by blocking malicious login attempts.
Given all these benefits, it’s wise to place CAPTCHAs in registration and login forms. A good WordPress registration form plugin or a CAPTCHA plugin will do the job.
You’ll learn how to add CAPTCHA in the login form and registration form with one such WordPress plugin in the following section.
How to Add CAPTCHA to WordPress Registration & Login Form?
We’ve chosen the User Registration plugin to demonstrate how you can add CAPTCHAs to WordPress registration and login forms.

It’s a brilliant registration form builder plugin with an in-built login form and user profile. Its drag and drop interface makes it super easy to build registration forms with as many custom fields as you wish.
And if you’re a WooCommerce store owner, you’re in for a treat. The plugin lets you add shipping and billing address fields right into the registration form and sync the checkout fields to the form.
That’s not all you can do with User Registration. But let’s focus on its CAPTCHA protection feature for now.
While we’re at it, we’ll also show you how to create a custom registration form to add the CAPTCHA.
So, let’s get started!
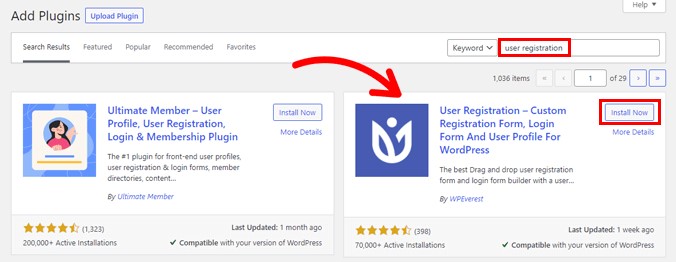
1. Install and Activate the User Registration Plugin
First of all, you must install and activate the free User Registration plugin on your website. To do this, log into your WordPress dashboard and open Plugins >> Add New. Search for the plugin and click the Install Now button once it appears in the search results.
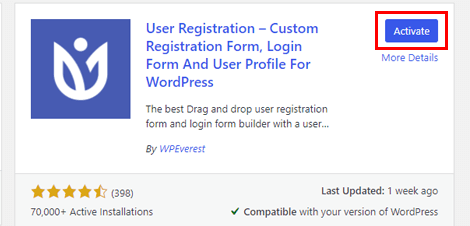
After that, Activate the plugin.
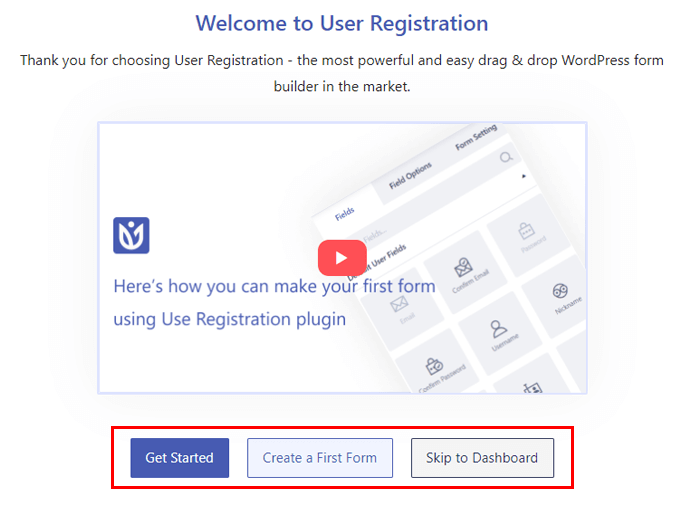
You’ll now see a welcome page that lets you either Skip to Dashboard, Get Started to set up the plugin, or Create a First Form directly.
No matter which path you decide to take, make sure you’ve turned on the Membership option. If you continue the setup process, you’ll get the Anyone can register option in the General Step. It’s turned on by default. So, keep it as it is and hit Next to proceed with the rest of the setup.
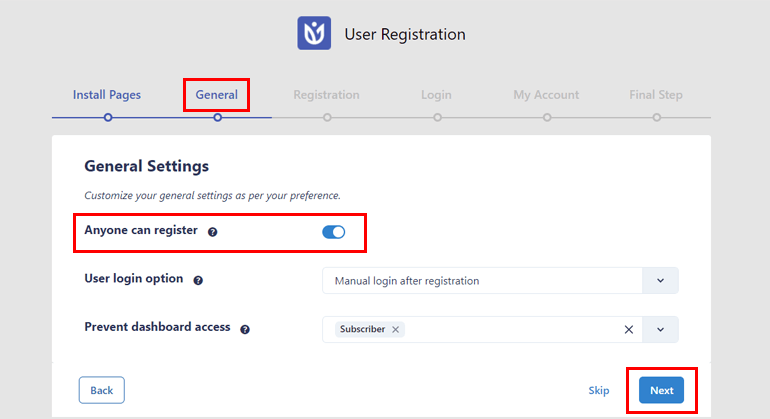
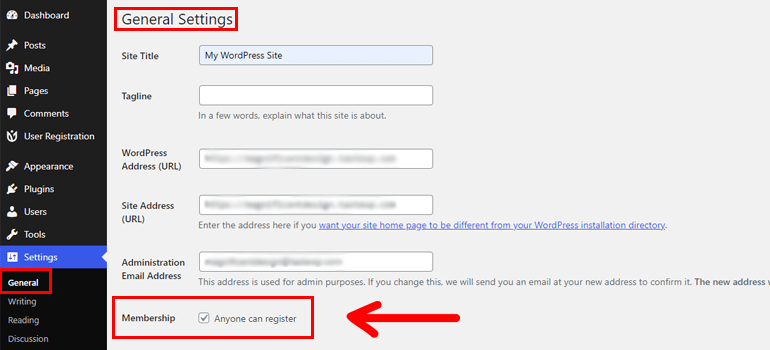
If you’ve already exited from the welcome page to the dashboard, open Settings >> General. Here, tick the checkbox for Anyone can register and click Save Changes.
This step is essential because only when you enable user registration, your users be able to access the registration form in the frontend and register themselves.
Once you’ve done that, you can move on to the next step.
2. Create a New Registration Form
Clicking on Create a First Form on the welcome page takes you to the User Registration form builder.
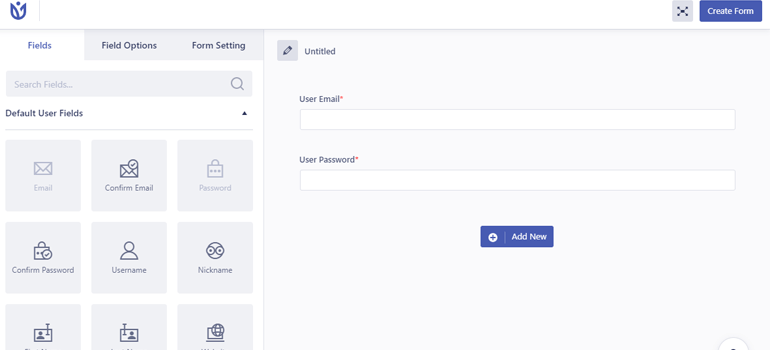
You can also access this builder from User Registration >> Add New.
To begin, give your form a clear name.
You’ll find all the required fields for a custom registration form on the left. You just need to drag these fields and drop them into the form on the right.
The form already has two fields User Email and User Password. Thus, you can add any other field you need to the form.
Here’s a complete guide to creating a user registration form in WordPress using the User Registration plugin.
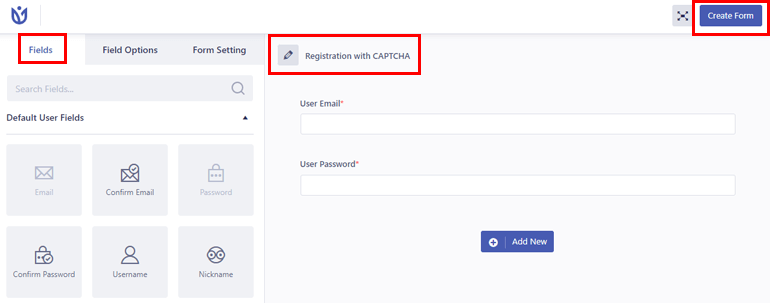
When the form building is complete, click Create Form. And there you have it! A simple registration form in a few quick steps.
3. Integrate Google reCAPTCHA and hCaptcha with User Registration
With the form created, it’s time to add the CAPTCHA. For this, go to User Registration >> Settings >> Integration.

Under the CAPTCHA option, you’ll see that the plugin offers 3 types of CAPTCHAs: reCaptcha v2, reCaptcha v3, and hCaptcha.
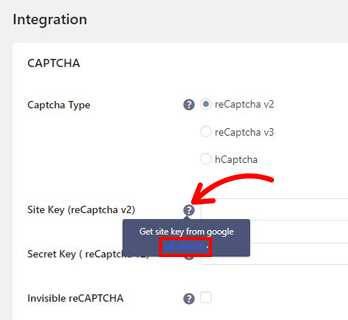
Regardless of which type you choose, you’ll need the Site Key and Secret Key to activate the CAPTCHA. Don’t know how to get the keys?
Simply follow the steps detailed below.
I. Get Site Key and Secret Key for reCAPTCHA and hCaptcha
A. reCAPTCHA Site Key and Secret Key
First, hover over the ‘?’ icon next to the Site Key or Secret Key label and click the link in the description.
This will open the official Google reCAPTCHA page.
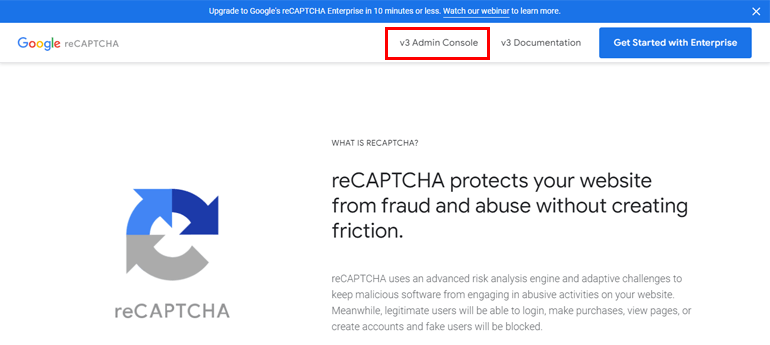
Click the v3 Admin Console menu in the header and log into your Google account.
After that, you’ll be taken to the Create page, where you can register a new site. This should be the site where you want to integrate the CAPTCHAs.
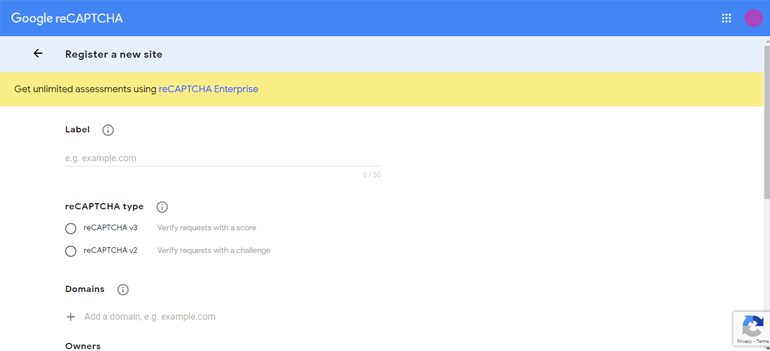
Type your website’s name in the Label and choose the reCAPTCHA type between v2 and v3.
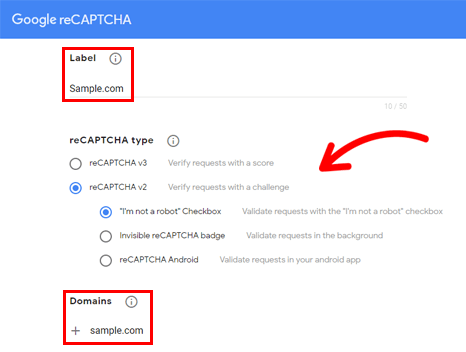
Choosing v2 comes with 3 more options:
- “I’m not a robot” Checkbox
- Invisible reCAPTCHA badge
- reCAPTCHA Android
After choosing the type of reCAPTCHA, add your site’s domain, accept the reCAPTCHA Terms of Service and click on the Submit button.
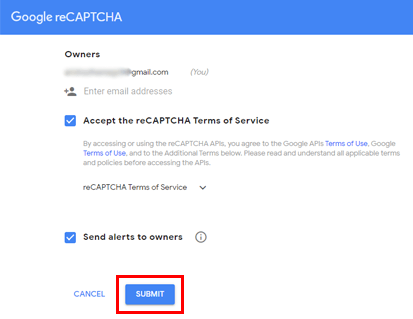
That’s it! Your site is now registered for Google reCAPTCHA.
All that’s left to do is copy the Site Key and Secret Key for later use.
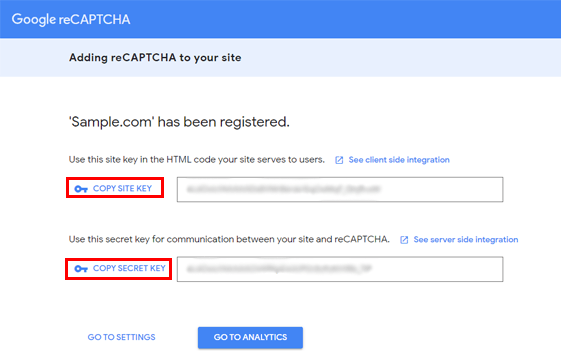
You’ll need them to integrate the CAPTCHA into your forms.
B. hCaptcha Site Key and Secret Key
Similar to reCaptcha, open the link to the official hCaptcha page from the link provided in the pop-up description.

Next, open the sign-up page by pressing the Sign Up button.
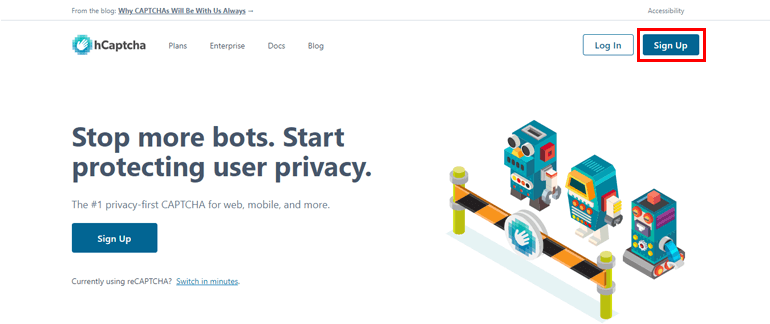
There are several types of plans hCaptcha offers to companies and individuals. For now, choose the free service for your website.

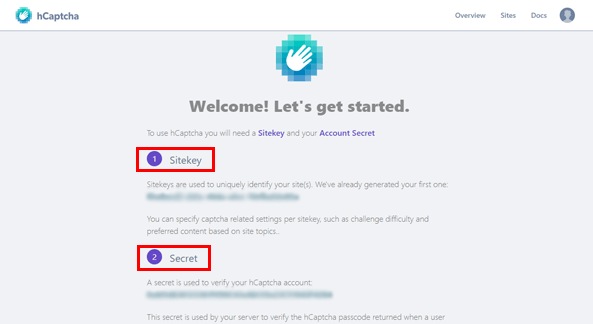
Then, create a new account and get your Site Key and Secret Key.
II. Integrate reCAPTCHA v2, v3, or hCaptcha
Now that you have the keys you need, go back to the Integration Settings under User Registration.
reCaptcha v2:
If you’re adding reCAPTCHA v2, select the reCaptcha v2 Captcha Type. Then paste the Site Key and Secret Key you generated for reCAPTCHA v2.
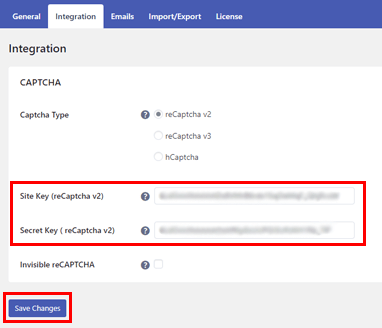
You can also make the CAPTCHA invisible. Finally, hit the Save Changes button.
reCaptcha v3:
Select reCaptcha v3 and paste the Site Key and Secret Key generated by Google reCAPTCHA. Then, set the Threshold score for validating requests.
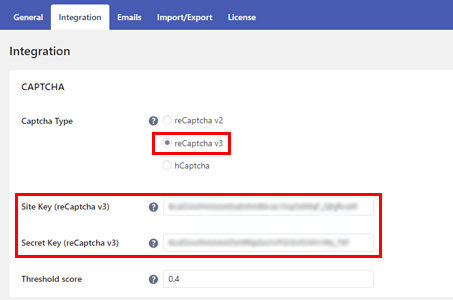
Here, the default is 0.4, meaning users who get 4 out of 10 total scores are validated as genuine users. You can increase the Threshold score for a stricter user evaluation.
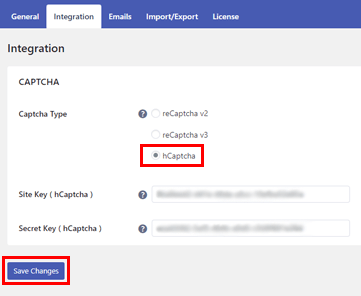
hCaptcha:
Choose hCaptcha in the Captcha Type option and paste the keys you generated from your hCaptcha account. Don’t forget to Save Changes in the end.
Congratulations! You’ve successfully integrated Google reCAPTCHA or hCaptcha with User Registration. You can now proceed to add them to your registration and login forms.
4. Enable reCAPTCHA Support for the Registration Form
Just integrating reCAPTCHA with User Registration isn’t enough. You still need to enable CAPTCHA support for the registration forms on your WordPress website.
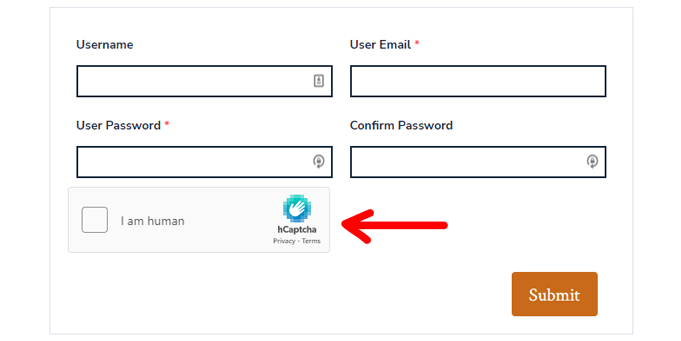
So, open the custom registration form you created earlier and go to its Form Setting. As you scroll down the General tab, you’ll see the Enable Captcha Support option.
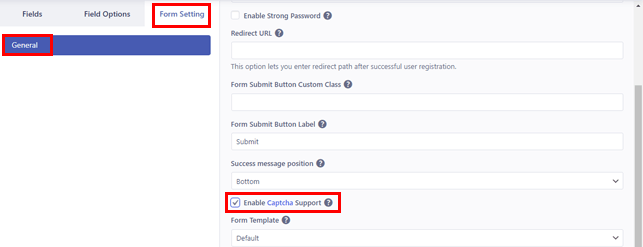
Tick the checkbox and click Update form at the top of the builder. Your registration form will now display CAPTCHA depending on the type of CAPTCHA you’ve integrated in the previous steps.
5. Enable Google reCaptcha for Login Form
Since User Registration already comes with an in-built login form, you don’t have to create another one from scratch.
Simply navigate to User Registration >> Settings and open the Login Options under the General tab.

Here, tick the checkbox for Enable Captcha and save the changes. This should add the CAPTCHA verification to your site’s login form.
Wrapping Up
CAPTCHAs are vital when it comes to the security of your website. And that includes the security of your registration and login pages. This blocks spam registrations and protects the accounts of genuine users.
The User Registration plugin makes it easy for you to add CAPTCHA protection to registration and login forms. The best part? You can choose between reCAPTCHA v2, reCAPTCHA v3, and hCaptcha.
Follow the guide above, and you’ll be able to integrate your registration and login forms with the CAPTCHA of your choice.
Moreover, you can also use this incredible plugin to enable strong passwords, assign user roles at registration, and let admins approve users after registration.
Learn more about User Registration through our blog, where we’ve covered its various features and how you can implement them for your site.
Also, follow us on Twitter and Facebook to stay updated.


![Zakra 3.0 | Zakra Pro 2.0 Release [Major Updates!]](https://i.ytimg.com/vi/g3rifl7kWvg/maxresdefault.jpg)